Happy Summer! Summer came to Montana very abruptly this year, we are hot and sunny! Hillbilly haven is in full swing with summer company and floats down the Yellowstone river.
Nothing spells summer more than a hot fudge sundae!! I have adapted this recipe from an old Better Homes and Garden cookbook my mom gave me years ago. This is a bit decadent, but worth the splurge! Every year I send my nephew a jar or two for his birthday and he hoards it all to himself. You may be tempted to skip the ice cream and eat it straight out of the jar.
Homemade Hot Fudge
1 1/2 Cups Bittersweet Chocolate Chips (I use Ghirardelli brand)
1/2 Cup Grass Fed Butter
3/4 Cup Coconut Sugar
10 Oz of Evaporated Goats Milk or Regular Evaporated Milk ( I like the Goats milk as it gives the hot fudge a tangy flavor)
In a heavy saucepan add the butter, chocolate and sugar and stir with a whisk until all is melted
Gradually stir in the evaporated milk and bring to a boil.
Reduce the heat and boil over low heat for 8 minutes stirring the whole time. It will thicken a bit.
Serve warm or store in glass jars in the fridge. It will keep for weeks.
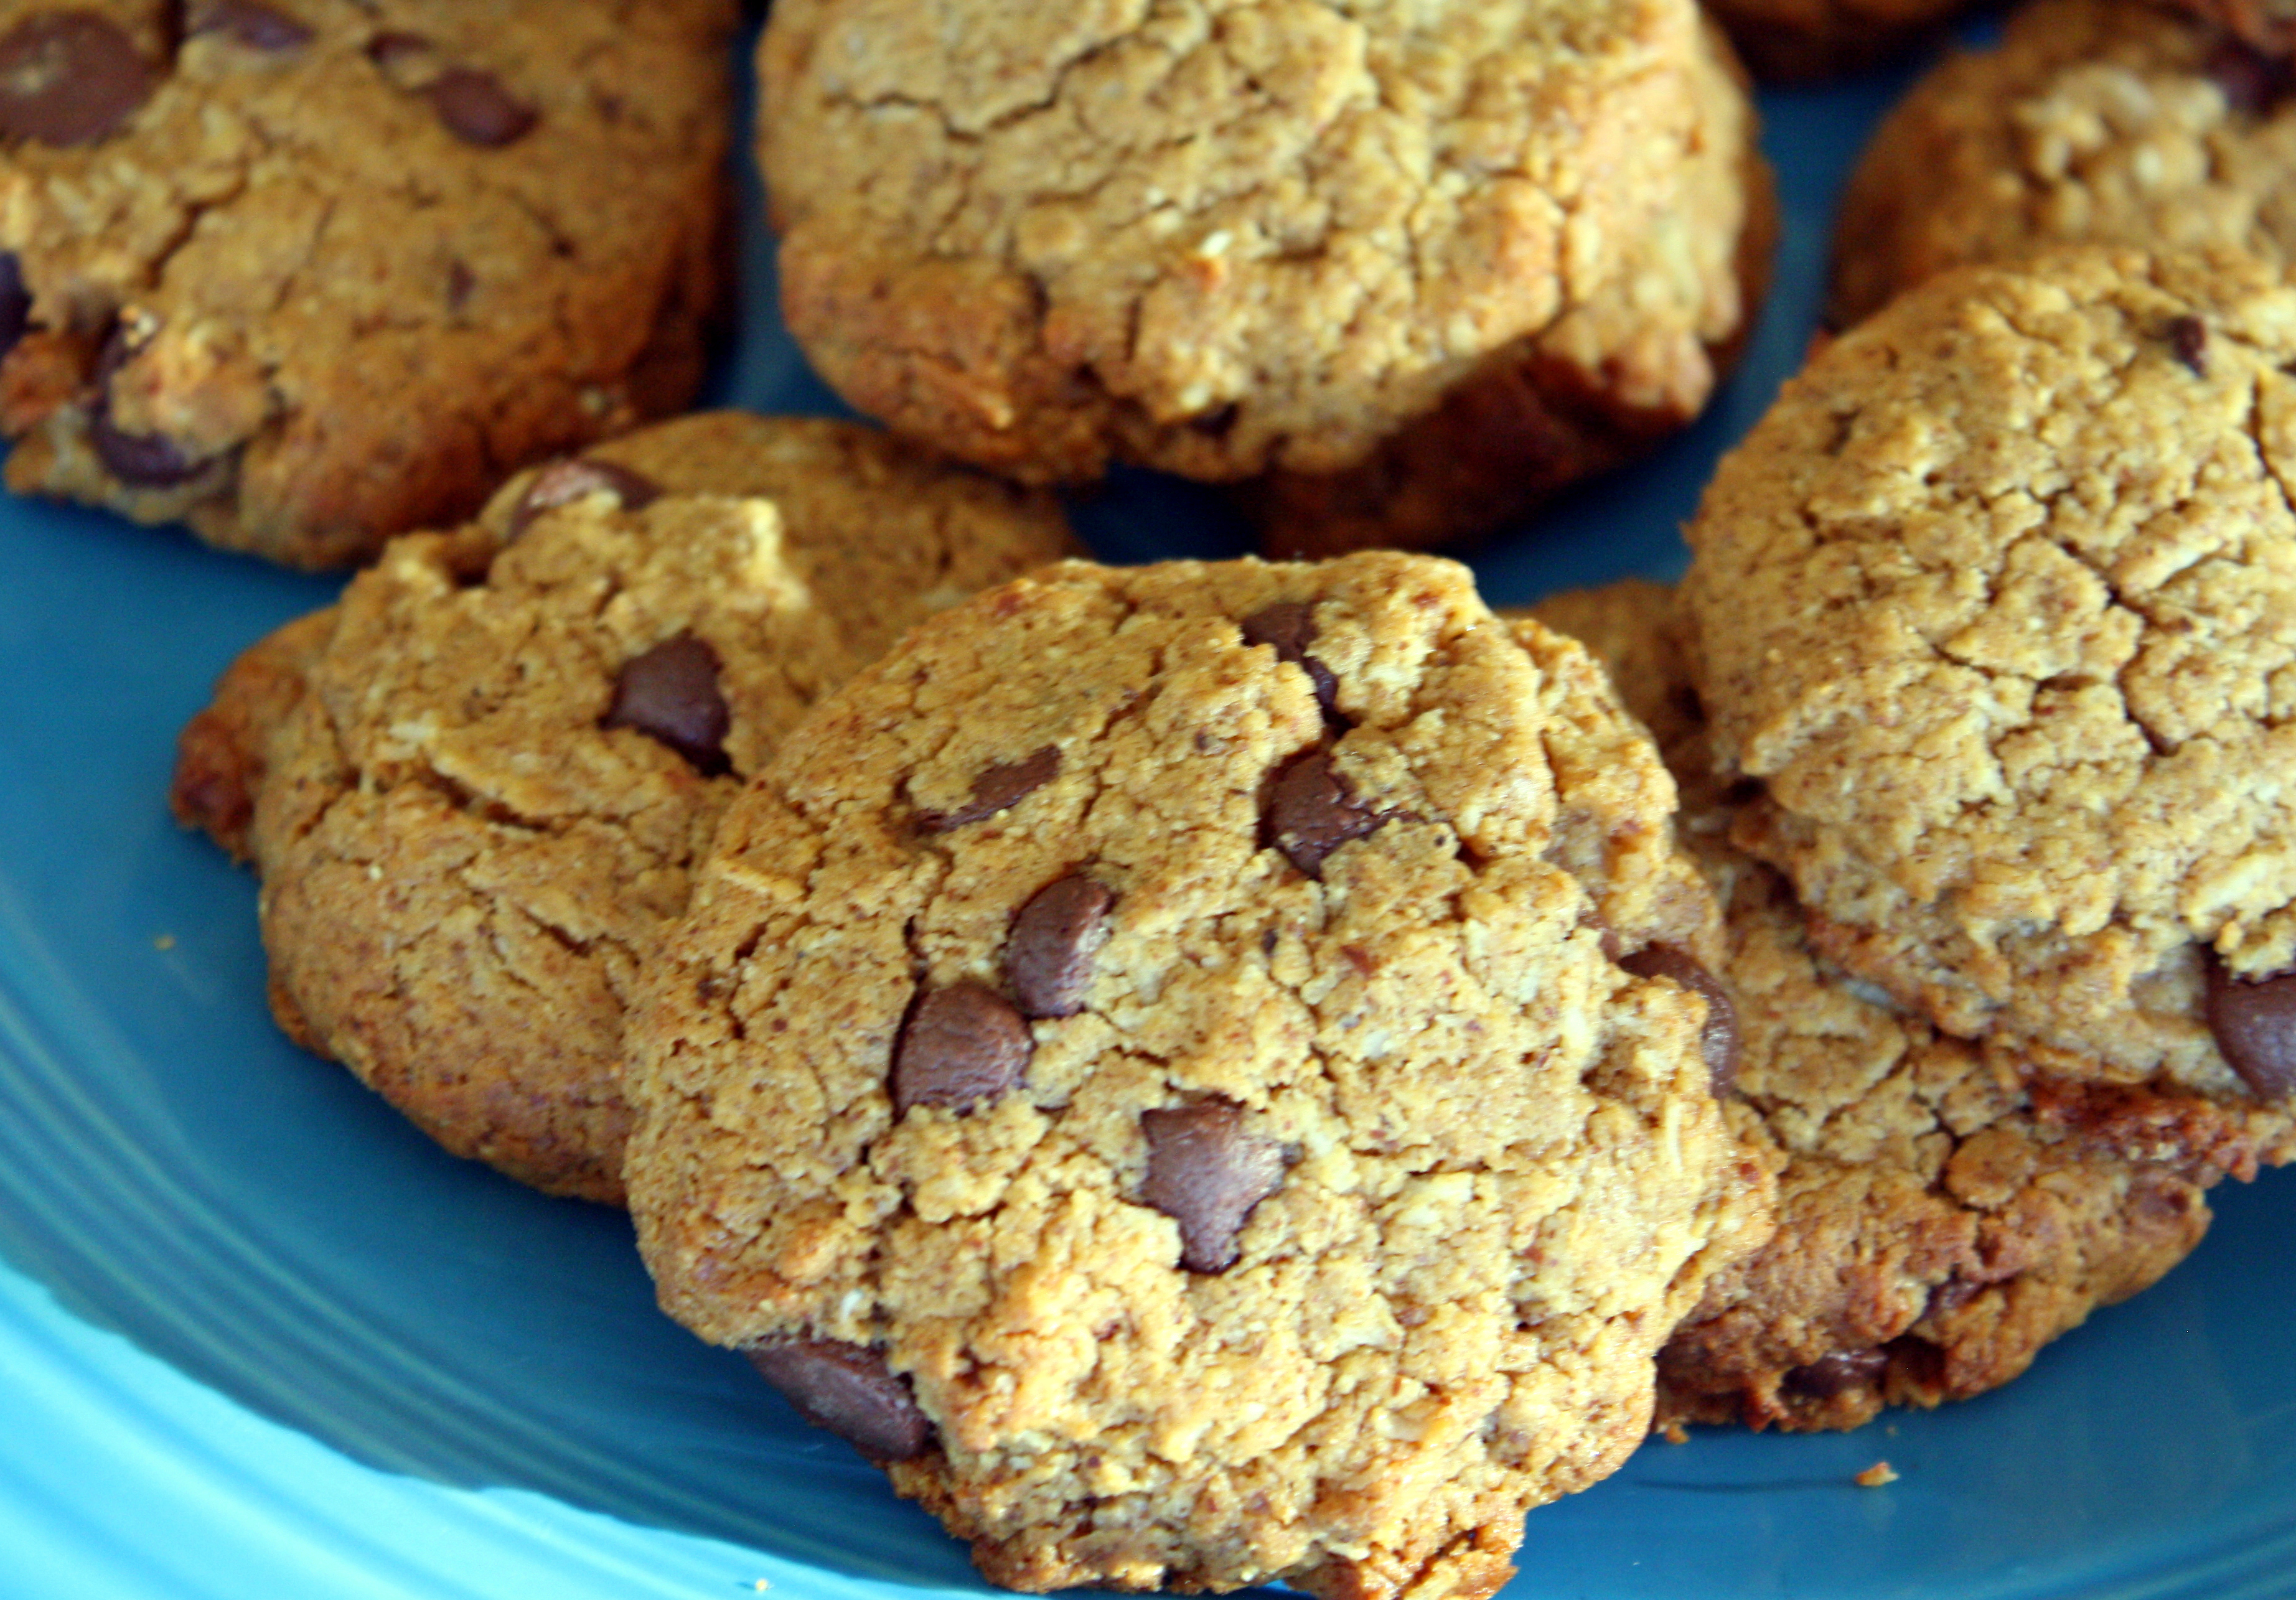
Paleo Gluten-Free Almond Butter Chocolate Chip Cookies
This post is dedicated to my mom who passed away on May 27, 2015, after a long struggle with Alzheimer’s disease.
My mom was an incredible person. She had eleven children (I’m number 10) and made each one of us feel special and loved. She made us homemade lunches, birthday cakes, and daily home cooked meals.
She loved the outdoors, especially being in and near lakes. In the summer, when we were wee ones, she would stick us in playpens outside, and as we got older, she would load a bunch of us into our big old family station wagon and head for a lake. Daily she shooed us outside to play and run around with the neighborhood kids, of which there were many to choose from.
She had a contagious laugh, which my sisters and I inherited, and she laughed often. She taught us not to care what others thought, but to be ourselves. She never held a grudge and forgave easily. She often extended her love and generosity to the neighborhood kids, and when anyone brought home someone for Christmas last-minute, there were always gifts for them.
My mom was more than just a mom, she was a gardener, nurse, chef, housekeeper, comedian, interior designer, party planner, antiques collector, baker, teacher, shopper extraordinaire, psychic ( she could always make me call her no matter how far away I lived), communicator, and friend.
One of my best memories was stepping off the school bus and opening the door to find fresh-baked cookies (by the dozens) sitting on the counter to cool. A sweet tooth’s dream come true. In our house you ate treats whenever you could get your grubby paws on them, because with 10 siblings they didn’t last (hmm maybe that’s were my food hoarding tendencies come from).
I like to imagine my mom swimming happy and free up in the spirit world in a big beautiful lake watching over her legacy…… us kids!
This is a tried and true recipe I found HERE. I have altered it only slightly from the original by cutting back on the sweetener and coconut. They are fast and easy and quite satisfying. I guarantee they will go fast, whether you have 10 siblings to compete with or not.
2 TBL Honey (you can use more if you have a really sweet tooth)
1/2 Tsp Baking Soda
1/2 Tsp Salt
1/4 Tsp Baking Powder
1/2 Cup Shredded Unsweetened Coconut
1/2 Cup Chocolate Chips ( I prefer bittersweet or dark Chocolate chips)
Preheat the oven to 350 degrees
In a mixing bowl, mix together almond butter, egg, vanilla, baking soda, salt, and honey until well blended. I like to do this by hand as I found the texture of the cookie gets cakey if you over mix the dough.
Add in the coconut and chocolate chips and mix until they are incorporated
Using a cookie scooper place cookies on a cookie sheet lined with parchment paper. Using your flat palm, press the cookies down to flatten just a bit (no worries if you don’t have parchment paper)
Bake for 6-8 minutes depending on your oven. They are done when the edges get golden brown and the tops crack a bit.
Let cool as they are fragile when hot and then enjoy! Makes approximately 16 Cookies.
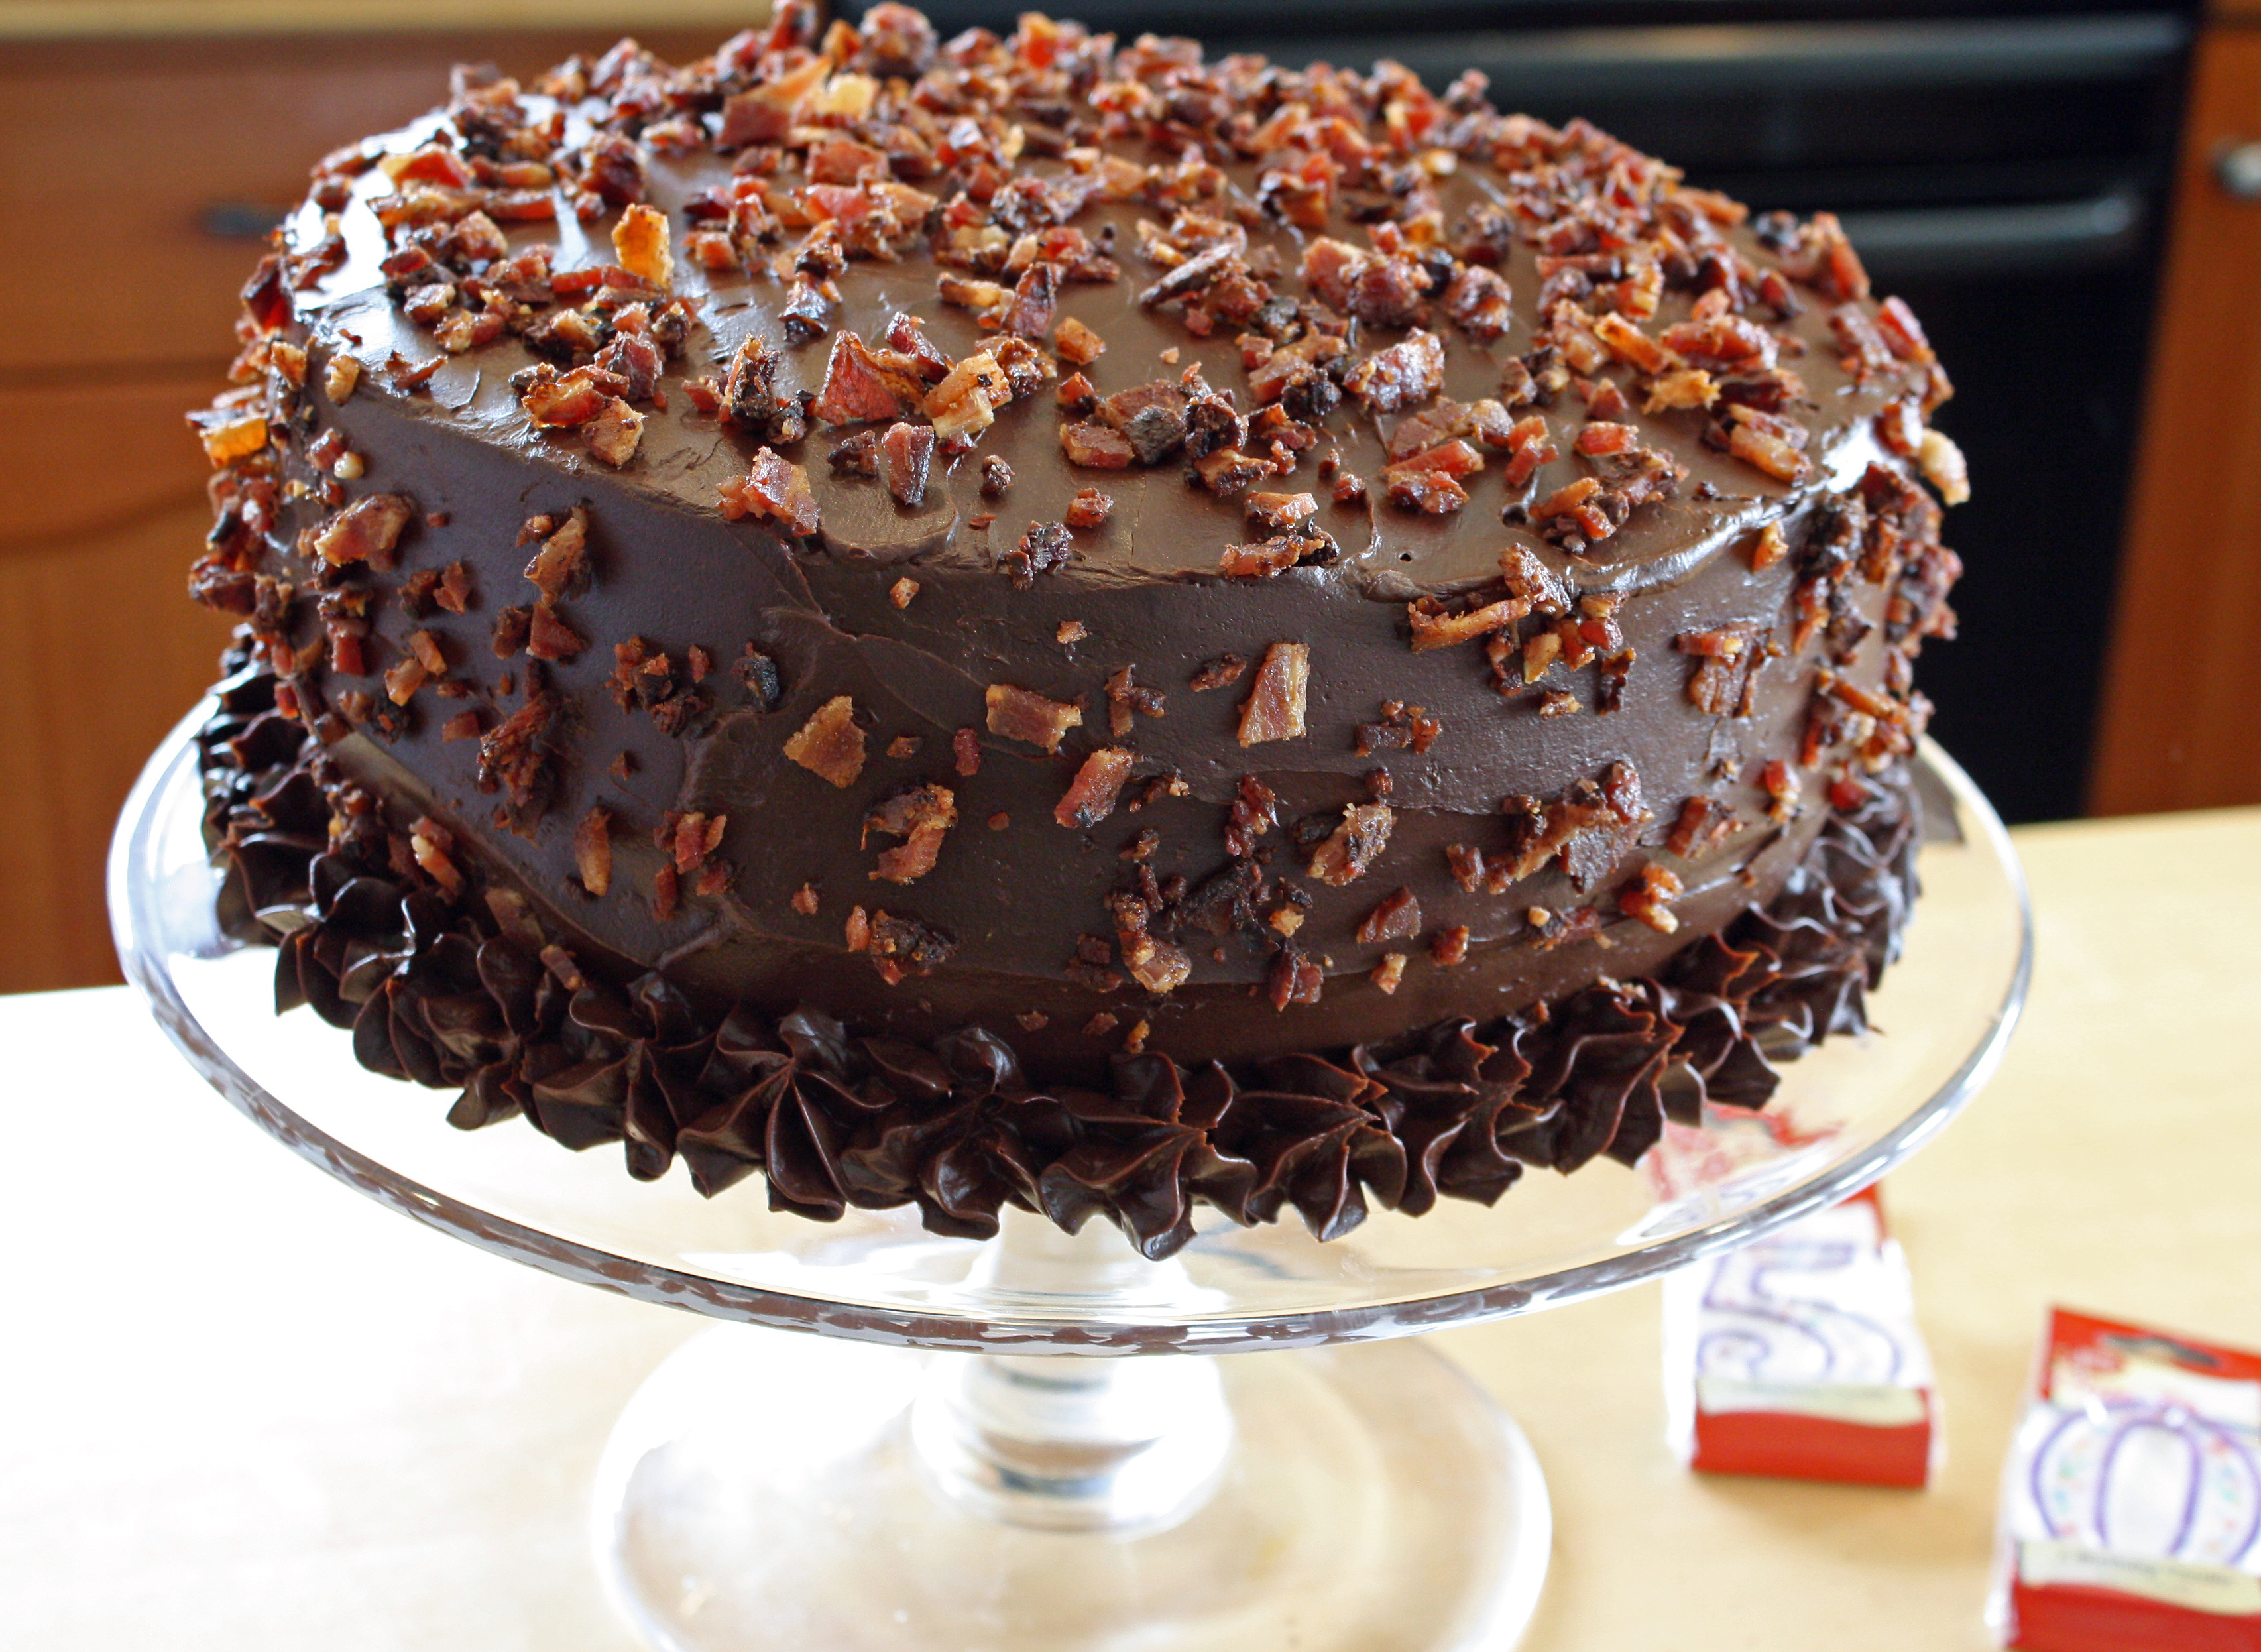
Yesterday was my friend Pete’s 50th birthday celebration, and when I insisted on making him a cake. He joked he would like a bacon flavored cake. Well since I aim to please, this is what I came up with. I am no stranger to dark chocolate or bacon for that matter, so this cake was not a stretch for me. I toyed with the idea of adding bacon throughout, but feared not everyone would have the same fondness for a bacon and chocolate combo, so I decided a dusting on the top would suffice.
I used the Chocolate Birthday Cake recipe from Paleo Spirit and it is fabulous! Made with coconut flour and in this case 18 eggs, (it was a 10 inch cake). It has a great sponge cake consistency with a fine crumb, and just the right amount of rich chocolate taste. Not to mention a lot of protein with all those organic eggs my own girls laid. I torted the layers and filled them with my standard frosting of whipped cream and cream cheese. Then I topped it off with some very fine dark chocolate ganache. WARNING: if you are not a fan of chocolate don’t try this at home.
I was very pleased with the results, but alas I am a die-hard dark chocolate addict fan. If you are like-minded, give this cake a whirl for any special occasion with or without the bacon on top. It will not disappoint, and for all its decadence and richness, it has relatively little sugar and no gluten, your flour eating friends will never guess it is gluten-free.
1- 8 oz. Package Organic Cream Cheese, at room temp
2 tsp. Vanilla Extract
3-5 TBL. Real Maple Syrup or to taste (I prefer it on the less sweet side)
In a large bowl whip the cream until there are firm peaks.
In another bowl whip the cream cheese until smooth ( it helps to let the cream cheese sit out hours before so it is room temp.)
Add the vanilla and maple syrup to the cream cheese and blend in until fully incorporated.
Add the cream cheese mixture to the whipped cream and mix again until all is fully incorporated and you have a firm creamy frosting.
This will fill the layers of a torted 10 inch cake. You can half the recipe for a 6 inch cake. It will also frost the outside of a 9 inch cake if you opt out of a chocolate ganache frosting.
This is a very easy frosting and the sweetness is of personal preference.
For the Frosting:
Chocolate Ganache
3 cups Organic whipping cream
24 Ounces Bittersweet chocolate ( I used Trader Joes 72% Chocolate)
Heat the cream until just before a boil.
Chop the chocolate up and add to a bowl.
Add half the cream to the chocolate and let sit a minute before gently stirring, being careful not to let air get into the chocolate.
Reheat the cream gently and add to the rest to the chocolate make sure all the chocolate is melted and the cream is fully mixed in.
Let the ganache sit until it cools and reaches room temperature at this point you can use it to frost the outside of your cake. (If it seems to runny let it cool for a bit longer). This will frost the outside of a 10 inch cake. You can cut the recipe in half if you are making a smaller cake or to fill the layers of a cake too.
Chop up some well cooked bacon and artistically sprinkle on top. (optional)
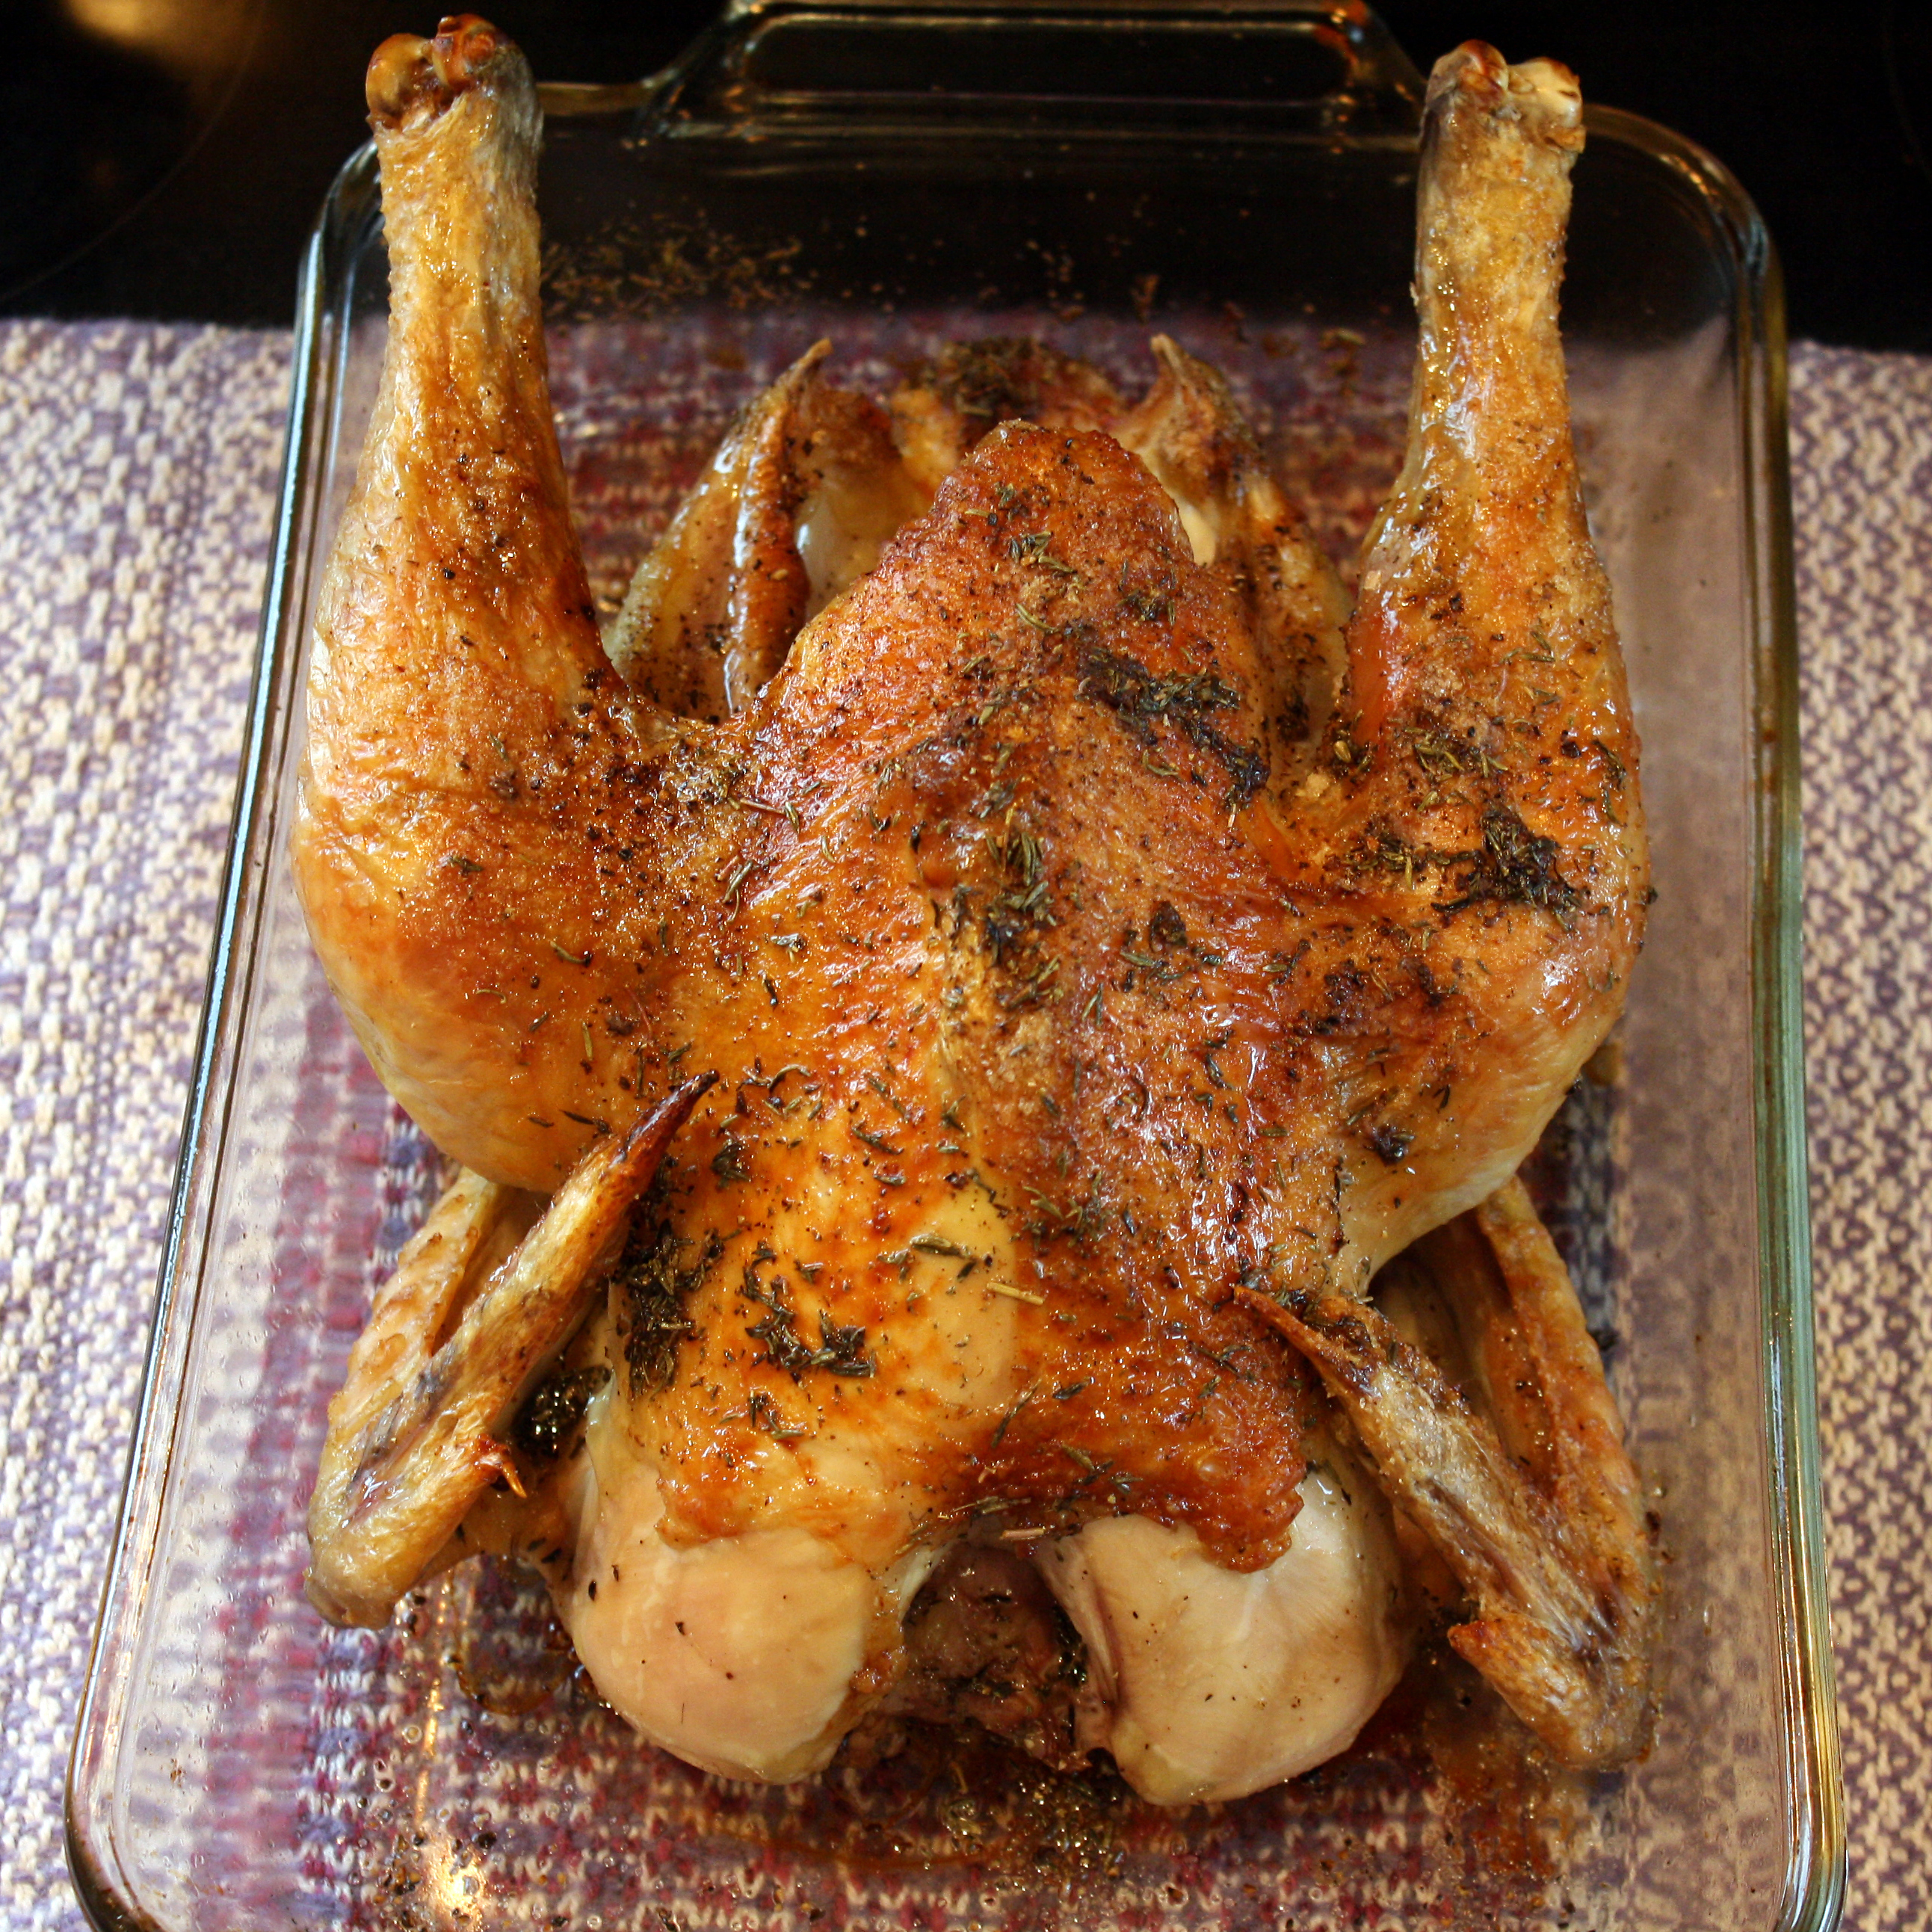
This is hands down the easiest most delicious roast chicken you will ever make or eat. Did I mention fast too?
We raised our own meat birds last year, so chicken has been on a regular rotation for our weekly meals. (As you can see we were a little rough butchering this one, as it is missing a bit of breast skin). We had a bit of a learning curve to get the technique down. I mourn for the lost skin, which is my favorite part, but this year we will preserve the skin. ( I have 30 plus little future roast chickens I am currently raising to put in the freezer this year).
I found this recipe on Epicurious a couple of years ago and now it is my go to. It requires no time to prep and is just soooo flavorful. Check out the original recipe HERE
Below you will find my version, which is pared down to be even faster and easier, but spares not the flavor.
Easy Roast Chicken (Adapted from Epicurious)
1 (4-6) pound Roasting Chicken (pastured is preferred the meat is very flavorful)
1 TBL Sea Salt
Pepper and Salt to taste
1-3 Tsp. Dried Thyme
Preheat the oven to *450 degrees
Rinse your bird and dry it thoroughly with paper towels (the drier the better).
Place into a roasting pan and salt and pepper the bird inside and out leaving a fine layer of salt on the outside skin. I tend to use around a tablespoon of salt for the outside.
Place in the oven and cook for 45-60 minutes depending on the size of your bird and I pull it out when the internal temp hits *160 degrees
Add 1-3 teaspoons of Thyme into the juices in the pan and Baste the outside of the chicken with the juices.
Happy May Day!! Man, the year just starts to fly by after January!
We are enjoying some fabulous spring weather here in Montana, a little sunshine mixed with rain and snow. The rainy days always have me in the kitchen whipping up a baked good (any excuse to bake, then of course eat it).
These muffins are a perfect way to use up the ripened bananas you have lying around. They are also a great way to get some chocolate into the mix too. The problem is you can’t eat just one!
This recipe is slightly adapted from Elana Amsterdam’s cookbook, Gluten-Free Cupcakes. I have featured another recipe from her book in the past, and this is another great one to try. Her cookbook is loaded with all versions of cupcakes with new and old twists. You can check it out HERE. She calls it a cupcake and adds frosting I call it a muffin as it requires no frosting in my opinion. Give a try, and see what you think!
Banana Date Muffins
Adapted from Gluten-Free Cupcakes
1 Cup (2-3) Ripe Bananas
1/4 Cup Coconut Oil or Butter
3 Medjool Dates, pitted
3 Large Eggs
2 Tsp. Vanilla
1/4 Cup Coconut Flour
2 TBL. Arrowroot Powder
1/4 Tsp. Sea Salt
1/2 Tsp. Baking Soda
1/2 Tsp. Baking Powder
2 Tsp. Cinnamon
1/2 Tsp. Cardamon
1/2 Cup Dark Chocolate Chips or Blueberries (optional)
Preheat the oven to *350 degrees. Line a muffin tin with 9-10 muffin papers.
Place the bananas, coconut oil or butter, dates and eggs in a high-speed blender or food processor and blend until smooth.
Add the rest of the ingredients and mix until all is well incorporated.
Stir in the chocolate chips or berries if using.
Scoop 1/4 cup of batter into each muffin cup.
Bake for approximately 20 minutes or until the muffin springs back to your touch.
Instead of a recipe today, I am going to share with you a little known cooking tip to help increase the health benefits of garlic.
When you use garlic in cooking, after mincing or crushing it, you should let it rest at least 10 minutes before using it. This helps to release certain compounds namely Allicin, the cancer fighting, antibacterial compound we get from eating garlic. It actually is a chemical reaction of two compounds Alliinase (an enzyme) and Alliin, which when released by mincing or crushing, turn into Allicin. It takes several minutes to transform but, it is well worth the wait for our potential health benefits.
So include garlic in as much of your cooking as possible. Mince or crush it first and let it rest while you prepare the other ingredients for your dish. Read more about it HERE and HERE.
On another note, as you may recall, my New Years resolution was to try something new each month. Well I’m here to tell you I will not disappoint this month (April). Drumroll please…..my new thing this month was to buy 3 little pigs and raise my own bacon.
Believe me this decision did not come easily, as I find pigs to be really cool and fun animals. But I do love all things pork and find it really important when I eat it, for it to be of the highest standard (a pastured, well fed, happy pig).
I also think it will be a really good learning experience for my girls to see how and where their meat comes from. They already have been exposed to this as my husband is a hunter and processes his own game. We also took on raising our own meat birds last year, but the more exposure the better in my book.
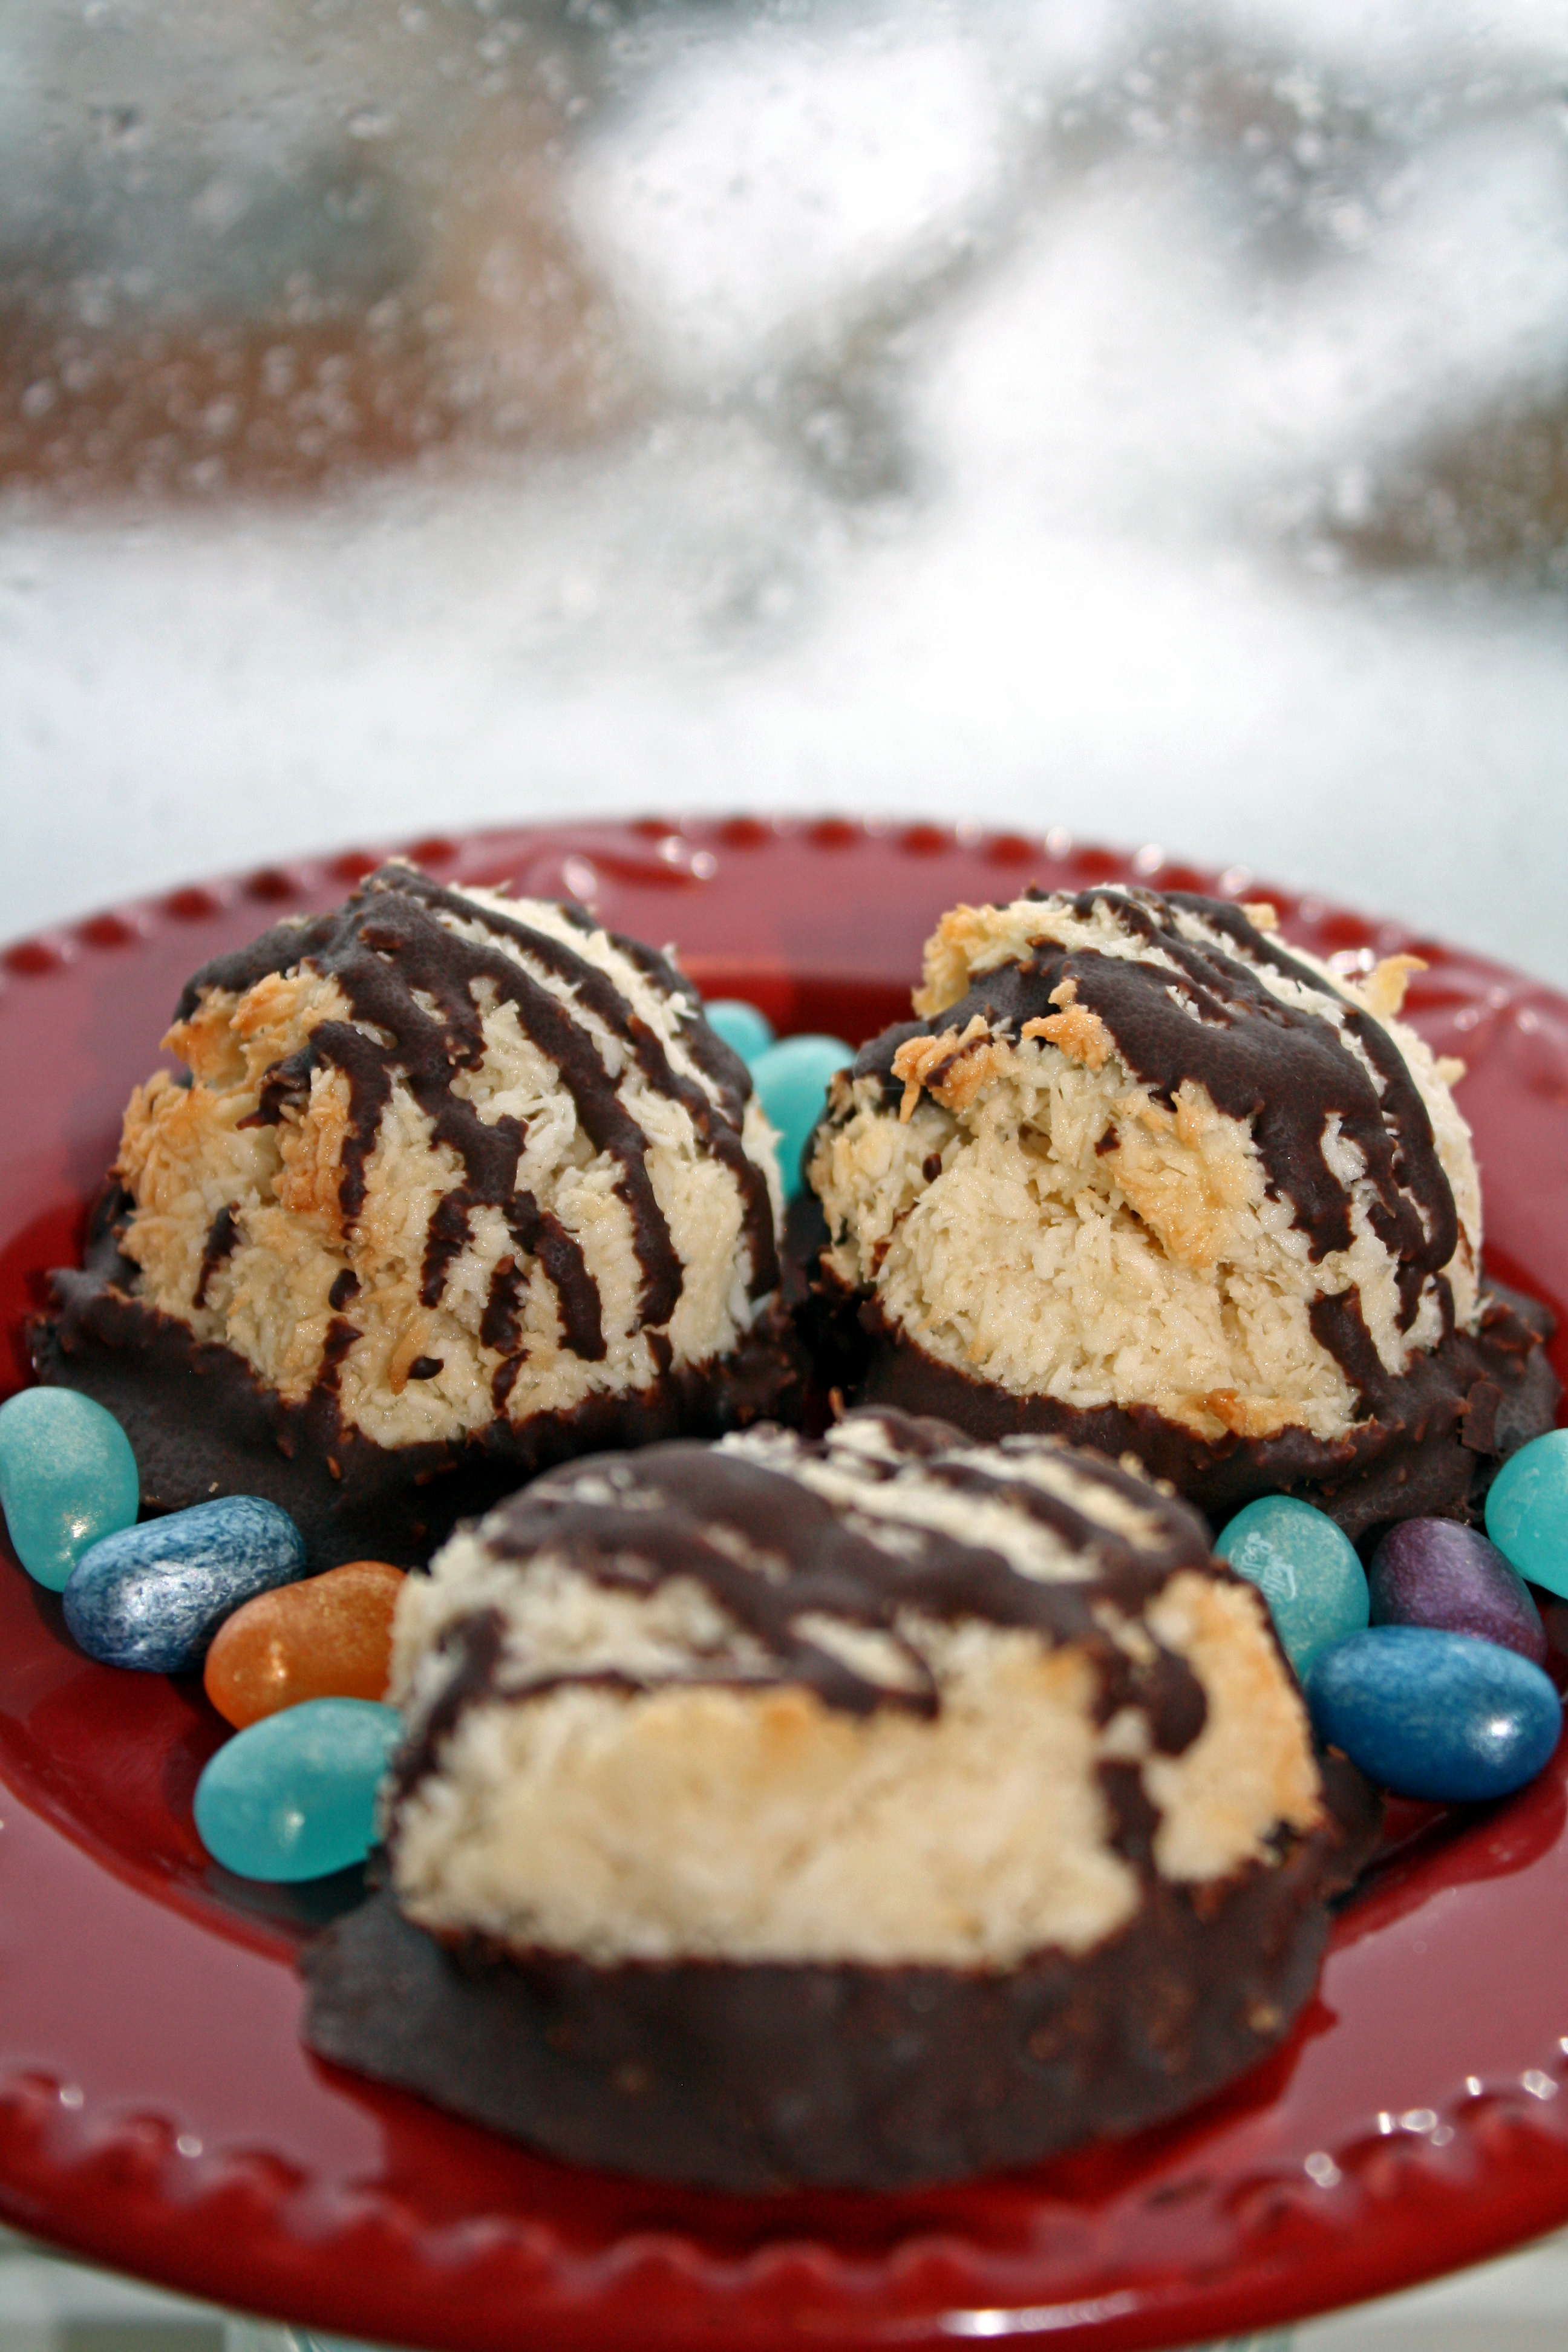
Excuse my delay getting this Easter post to you. I can assure you these macaroons are good for any occasion.
We have a tradition of doing an Easter Egg Hunt and Brunch every year on Easter Sunday. Last year we happened to be out of town for Easter, but my oldest daughter would not stand to miss the brunch and hunt, so we had one in May. We are strong on tradition here at Hillbilly haven.
This year we had a great group of friends join us in the snow, which didn’t slow the egg hunters down one bit. We had an array of delicious food to share and these macaroons were a tasty treat to add to the mix. They are especially delectable if you are partial to chocolate and coconut together, think Mounds candy bars.
I found this gem of a recipe in Mediterranean Paleo Cooking,check it out HERE. This book is chock full of gorgeous photos and tasty recipes. The macaroons are simple and easy and just the right amount of sweetness to satisfy the tooth, the sweet tooth that is.
Chocolate Dipped Coconut Macaroons
(adapted from Mediterranean Paleo Cooking)
4 Large Egg Whites, room temperature
1/4 tsp. Sea Salt
1 tsp. Vanilla
Scant 1/4 Cup Organic Sugar or Honey (I used sugar but I bet honey would make them chewier)
3 Cups Unsweetened Shredded Coconut ( I use Enjoy Life Brand)
1/2 Cup Dark Chocolate, chopped and melted
1. Preheat the oven to 325* F. Line a baking sheet with some parchment paper.
2. Whip the egg whites until they form medium-firm peaks.
3. Whisk in the vanilla and salt. Slowly whisk in the sweetener a little at a time until it is all incorporated.
4. Fold the coconut into the egg white mixture, being careful not to stir too hard so as to lose your volume.
5. Spoon the batter onto the cookie sheet in 2 tablespoon mounds. (you may have to use your hands to consolidate the mounds,)
5. Bake the cookies for 15 minutes or until they are golden brown. Let cool on a rack.
6. Dip each bottom into the melted chocolate and place back on the parchment. Drizzle each top with chocolate using a spoon. (If you are a huge chocolate fan you could dip the whole cookie and make a candy bar!)
7. Let the chocolate set up and Serve!! Makes 18-19 cookies
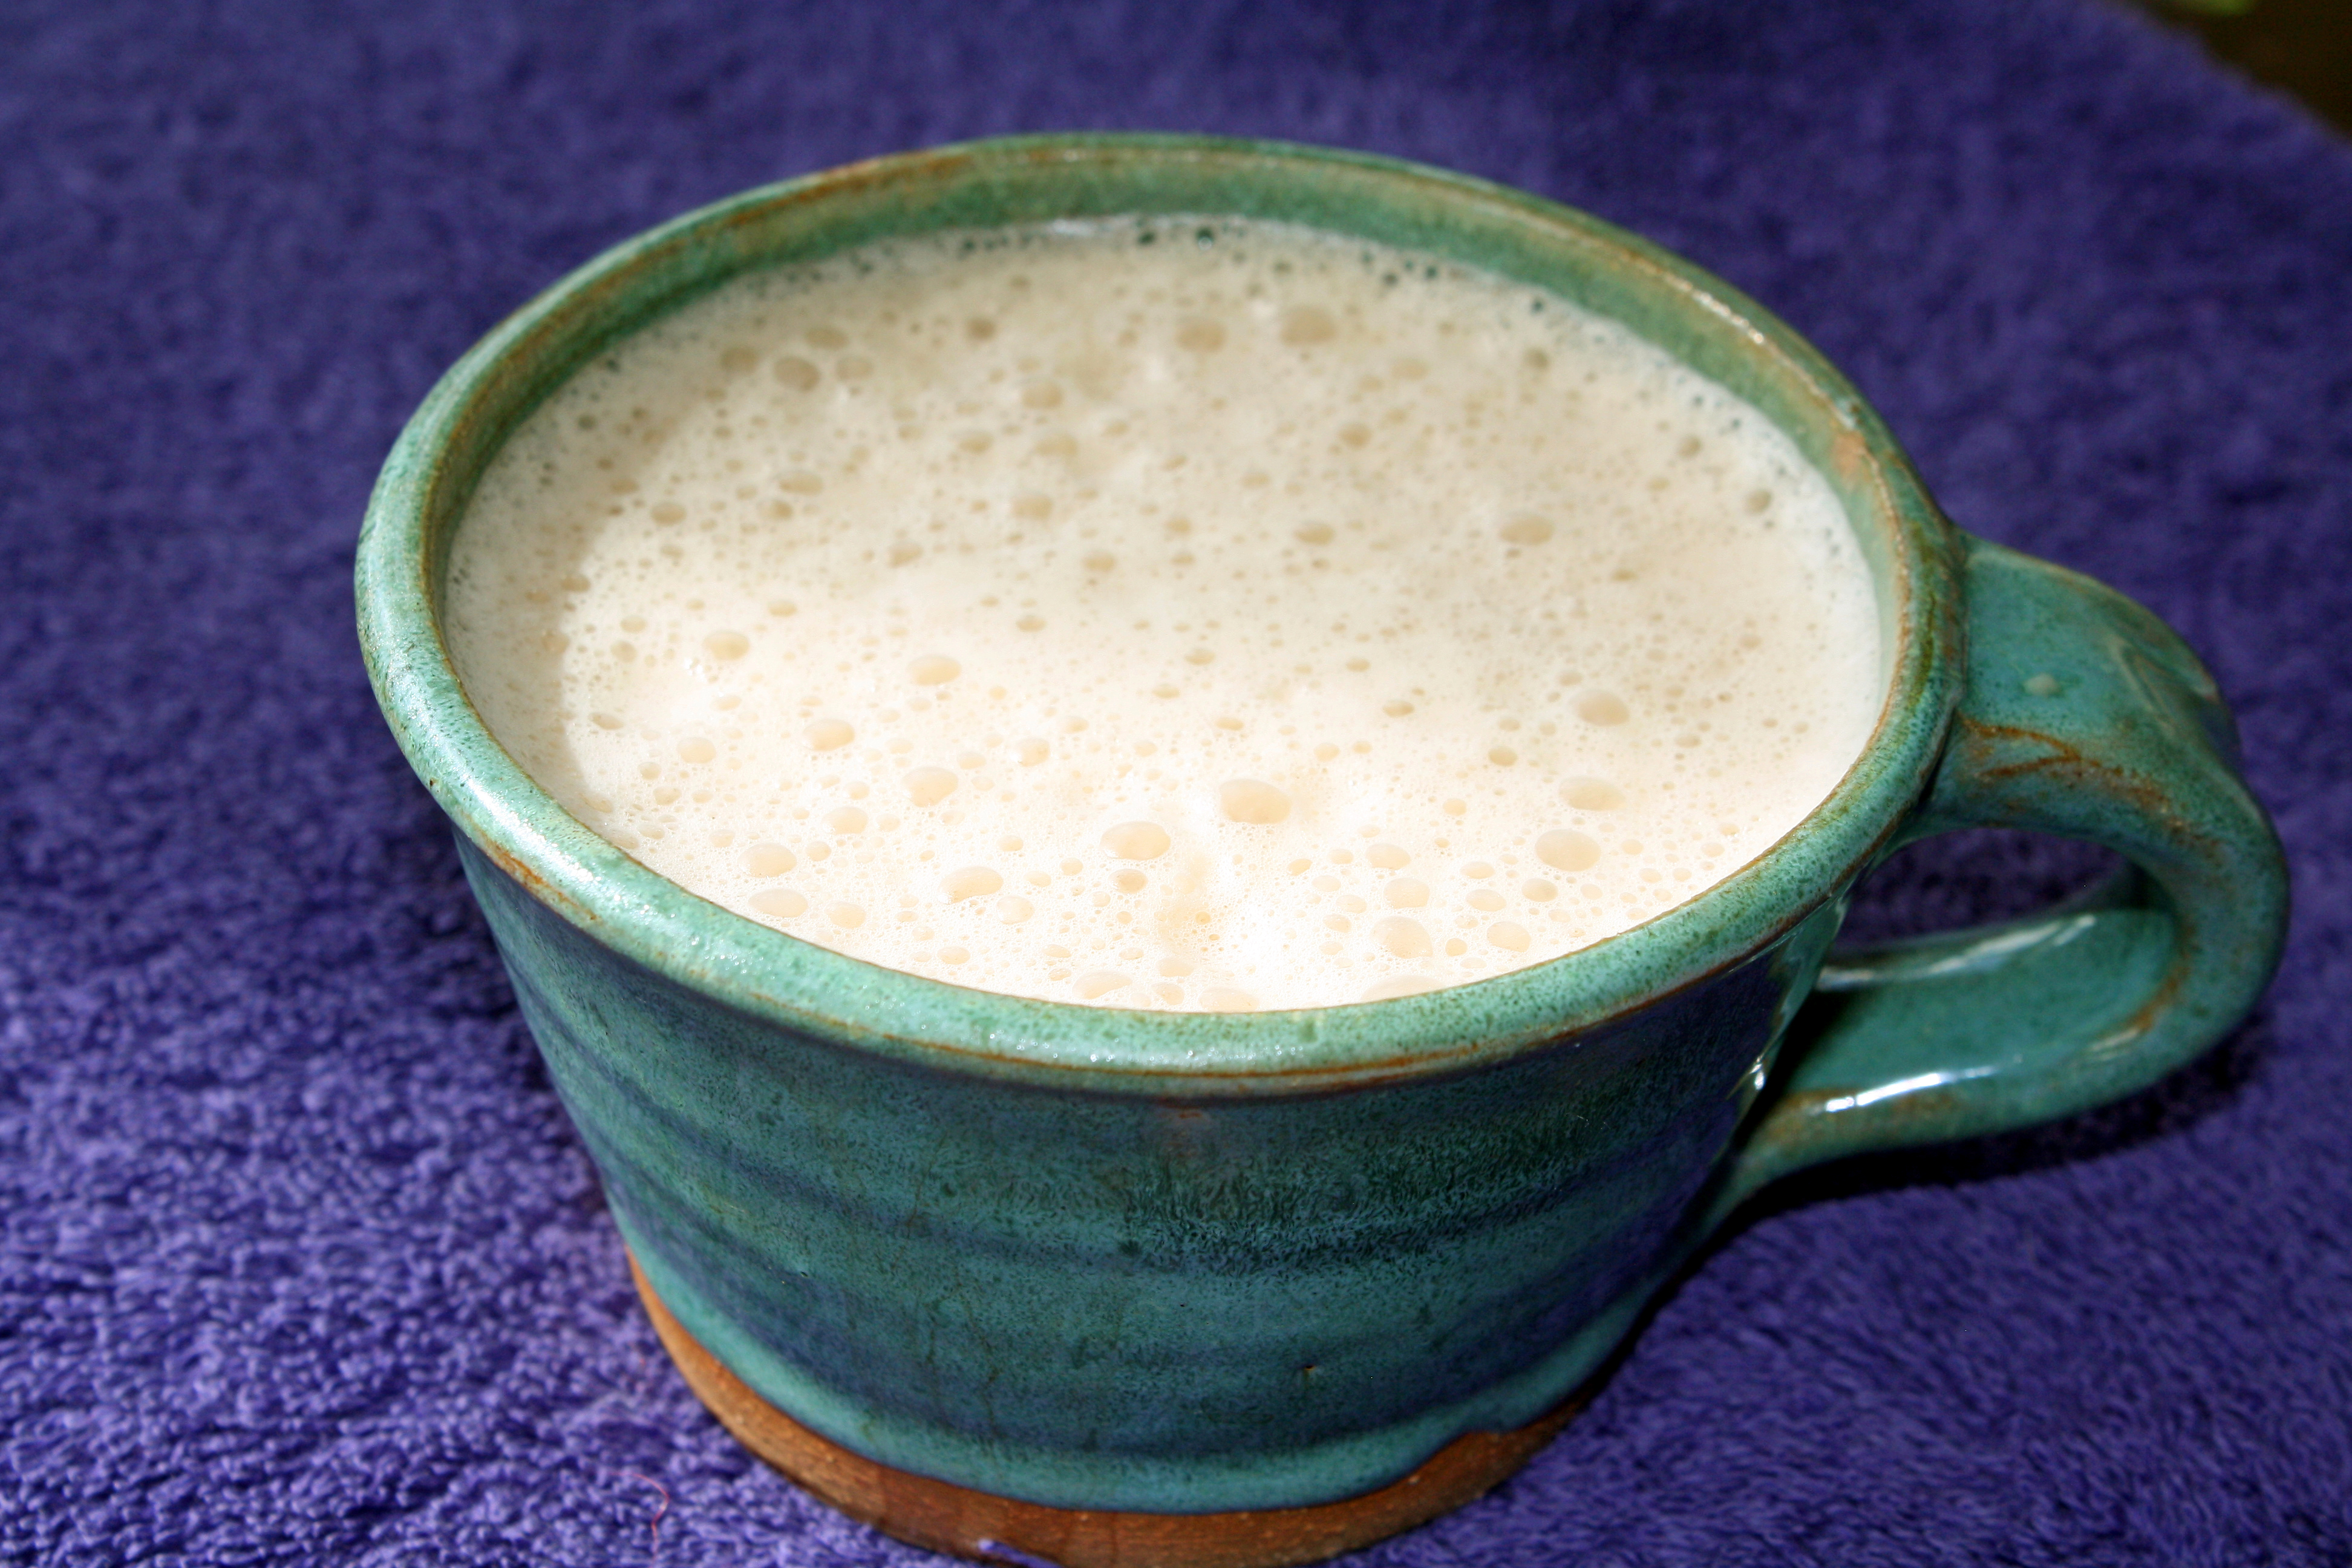
The new thing I tried for March is coconut oil in my coffee, (if you are new to the site my new years resolution was to try something new each month). I’m sure you all have heard of Bulletproof Coffee, if you haven’t HERE is the skinny on it. I have heard and read about this some time ago, and never have gotten around to trying it. I haven’t done the butter part of the recipe as I don’t have any salt free butter on hand. But I can tell you, just with the coconut oil alone, it is DELICIOUS! The trick is using really good organic coffee and a blender to make the magic happen. It resembles a creamy foamy latte.
Why coconut oil in coffee you ask? Well the premise is that instead of eating breakfast you drink your fat laden coffee and: one-you are not hungry, two-you are transforming your body into a fat burner ( medium chain fatty acid requires no conversion in the body it is just straight on energy), and three-it makes you super alert, energetic, and “bulletproof”.
I haven’t done it enough to see if the three things above are true for me, but it tastes so good, that I am planning on experimenting with it over the next month. I love coconut oil, not only does it taste great, it has many health benefits. Read more about it HERE. I dare you to try it!
Coconut Oil Coffee (based on the Bulletproof Coffee Recipe)
1 Cup freshly brewed Espresso or French pressed or Pour over Organic Coffee(Go Organic-Coffee is one of the most heavily sprayed crops)
1 TBL Grass Fed Unsalted Butter (optional) (Grass fed butter has better fats in it)
1 TBL Coconut Oil
1 TBL Half and Half or Full Fat Cream (optional)
Make your preferred method of freshly brewed coffee.
Add the coconut oil and cream into a blender.
Pour the coffee into the blender.
Blend for 20-30 seconds at high speed.
Pour your frothy goodness into your favorite mug and Enjoy the fat burning energy!
The first time I noticed I had an issue with dairy was through my consumption of ice cream. Yes, that much beloved creamy, delicious, frozen treat that almost all people in the world love. I was in denial at first and kept right on consuming, but the same old reliable symptoms happened again and again, and I had to face the facts. In fact it got to where I felt so terrible after consuming ice cream, that I gave it up all together.
Have you ever seen the episode of the Simpsons, where for a science project Lisa is comparing Bart’s brain with that of a hamster? She wires a cupcake with electricity so every time Bart reaches for it, he gets zapped. It happens repeatedly and he just keeps saying ouch and reaches again and again. You can liken that to my eating ice cream.
Fast forward to eating real whole foods and being on a paleo journey, and my discovery of coconut milk. Have I mentioned I love all things coconut? Coconut flakes, flour and milk, I love them all. Coconut milk is a staple in my pantry, it is so delicious, full of good for you creamy fat, and makes a dang good ice cream to boot. I found a great recipe for chocolate ice cream at the spunky coconut HERE. I did purchase her cookbook ‘Dairy Free Ice Cream’, it is chock full of delicious recipes, you can find it on Amazon.
We are part of a cow share, which means I can get my hands on some really good raw milk, which my daughter loves. When I have some milk in the fridge, I sometimes make this ice cream with a combo of coconut milk and raw milk, (which I seem to tolerate better in small doses). If you are good to go with dairy, you could forgo the coconut milk and just use heavy cream, but I do prefer the straight coconut milk or the mixture personally. Either way this is a delicious, easy, and fast ice cream with the added benefit of gelatin, and the very subtle sweetness provided by the dates. Give it a try!
Paleo Vanilla Ice Cream (adapted from ‘Dairy Free Ice Cream’)
2 Cans (13 oz each) Full Fat coconut milk or cream (I use Natural Value brand coconut milk or Trader Joes coconut cream)
or
1 Can Coconut milk and 11/3 cups Heavy cream or full fat milk
1 TBL Vanilla
1 Vanilla bean (optional but nice if you have it)
8 Medjool Dates (soft if they are dried out soak them in warm water to soften)
1 TBL Gelatin (dissolve in 1/8 cup cold water then add 1/8 cup boiling water)
Place all the ingredients in a high powered blender or food processor adding the gelatin last right before you mix.
Mix until it is creamy (if it separates turn up the speed and keep mixing it will come together).
Pour into your ice cream maker and proceed following your ice cream makers directions.
Store the ice cream in the freezer or eat right away!
Happy March! Spring is rolling in very quickly here in Montana, unlike some other places in the country, we have had a mild winter, but spring is always a welcome sight. On a hike today I saw my first wild flower, crazy but true.
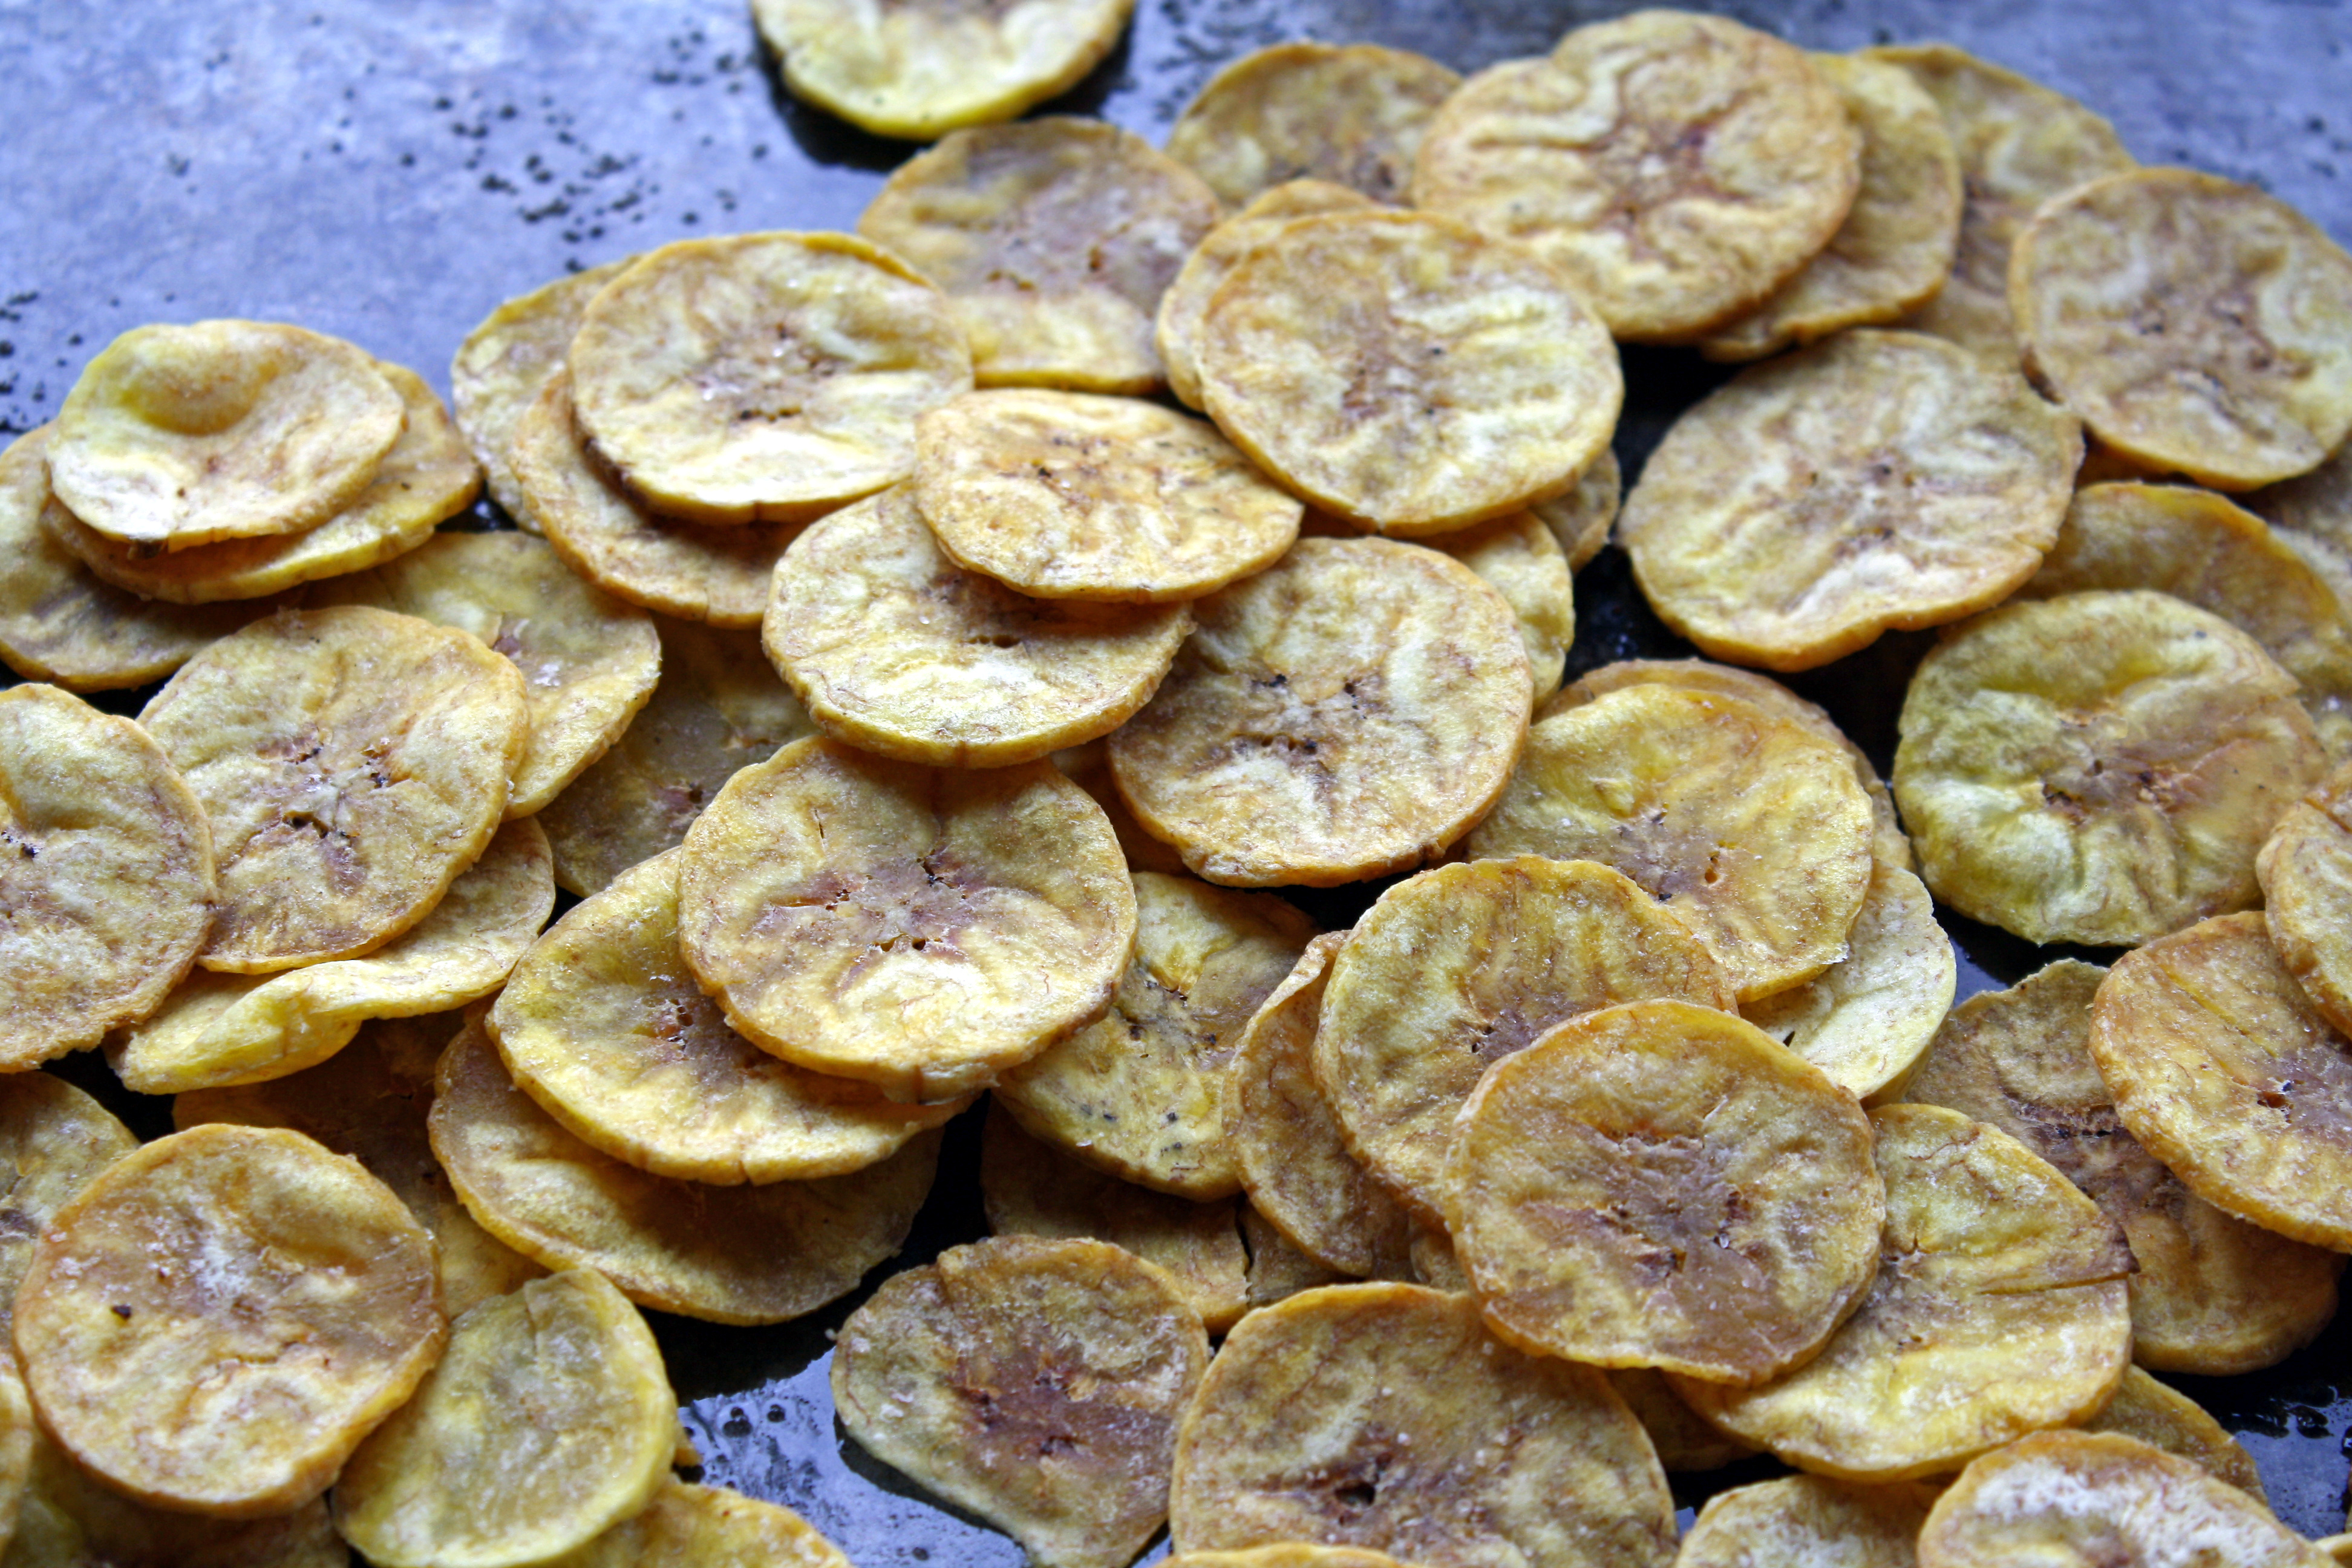
When I started down the path of cleaner eating, I realized that my beloved potato chips would not be on the “okay to eat list”…. (well I’ve always known that potato chips or any chips really aren’t the most nutritious foods around, but they are so dang tasty).
I don’t know very many people who don’t love or at least like potato chips or corn chips or tortilla chips. In my effort to mostly (I am human so partake sometimes) cut them out of my diet, I searched high and low for a crunchy salty satisfying replacement. I was falling short of finding anything, until one day at a local natural foods store, I stumbled upon plantain chips. I immediately bought them and was very pleased with the crunchy salty taste and finally felt I wasn’t missing out.
Fast forward a few years later, I realized how easy it was to make these babies at home with better oil and at a fraction of the price!! Sometimes I just want a vehicle for dips or guacamole that isn’t raw vegetables, something salty and crunchy without bad seed oils or GMO corn and I have found the answer.
I love plantains they are nutrient dense and so versatile, I know this is blasphemous to some, but if there was a plantain god or goddess I would worship them.
Paleo Plantain Chips
1 Large Green Plantain (yes the greener the better, less sugar= more starch = more crunch)
1 1/2 TBL Coconut Oil Melted
Sea Salt
Using a mandolin or a food processor slice the plantain into 1/16 inch rounds.
Grease two cookie sheets with coconut oil and mix the rest in with the plantain chips so they are well coated with oil.
Place each round in rows onto the cookie sheet with no overlap and sprinkle with sea salt.
Bake in a 300 degree oven for 15-20 minutes or until the chips are just starting to brown (test for crunchiness).
Let cool and devour !!! Makes approximately 85 chips (you may want to double the recipe they are soooo good!)