Category Archives: Savory

Deep Fried Brussel Sprouts

The Fryer
The Fryer
Deep Fried Brussel Sprouts

Even if you don’t like Brussel sprouts, I bet you will like them prepared this way.  I had my first taste of these babies last year when my husband and I went out to dinner.  They were delicious, however I felt bad when I found out they were fried in, of all things, soybean oil !!!   Seed oils are not good for you, period, so I decided I would make these at home and avoid any more restaurant surprises.

My first attempts didn’t work out to well, as I was trying to fry them in a pot on an electric stove.  For those of you that cook on electric, you know it is next to impossible to maintain a stable heat.  They turned out soggy or burnt.

I finally decided to buy myself a little deep fat fryer, thank goodness for Amazon Prime and the ability to impulse shop your heart out.  I am very pleased with the little fryer (pictured above) that I ended up with.  I wanted something that didn’t require too much oil, as I planned on using coconut oil and as you may or may not know it is a tad pricier than your run of the mill “bad for you” seed oils.  Coconut oil is a good choice as it has a high smoke point and has some very healthful qualities.   Also I don’t fry things that often, so I have no need of maintaining a huge vat of oil for extended periods.  This inexpensive fryer works great!

If you have a gas stove and decide to try making these  in a pot on it,  let me know how they turn out otherwise, I recommend a little deep fryer the one above you can get here.  Then make these tasty little treats….. even the kids will like them!!


Fried Brussel Sprouts

1 Pound Brussel Sprouts trimmed and washed cut in half and towel dried

Coconut oil

Salt to taste

  1. Fill your deep fryer according to manufacturer directions with coconut oil or use a small sauce pan and 1-2 cups of coconut oil.
  2. Heat the oil to *375 degrees
  3. Fry the Brussel Sprouts in little batches until the start turning brown around the edges and outside
  4. Lift the Brussel sprouts out of the oil and place in a paper towel lined bowl and sprinkle with salt.
  5. Let cool a moment and devour.  Repeat until they are all cooked.    Serves 1-4 People

Easy Simple Roast Chicken (I mean Stupid Easy)

Easy Delicious Roast Chicken

This is hands down the easiest most delicious roast chicken you will ever make or eat.  Did I mention fast too?

We raised our own meat birds last year, so chicken has been on a regular rotation for our weekly meals.  (As you can see we were a little rough butchering this one, as it is missing a bit of breast skin).  We had a bit of a learning curve to get the technique down.  I mourn for the lost skin, which is my favorite part, but this year we will preserve the skin. ( I have 30 plus little future roast chickens I am currently raising  to put in the freezer this year).

I found this recipe on Epicurious a couple of years ago and now it is my go to.  It requires no time to prep and is just soooo flavorful.  Check out the original recipe HERE

Below you will find my version, which is pared down to be even faster and easier, but spares not the flavor.

Easy Roast Chicken (Adapted from Epicurious)

1 (4-6) pound Roasting Chicken (pastured is preferred the meat is very flavorful)

1 TBL Sea Salt

Pepper and Salt to taste

1-3 Tsp. Dried Thyme

  1. Preheat the oven to *450 degrees
  2. Rinse your bird and dry it thoroughly with paper towels (the drier the better).
  3. Place into a roasting pan and salt and pepper the bird inside and out leaving a fine layer of salt on the outside skin.  I tend to use around a tablespoon of salt for the outside.
  4. Place in the oven and cook for 45-60 minutes depending on the size of your bird and I pull it out when the internal temp hits *160 degrees
  5. Add 1-3 teaspoons of Thyme into the juices in the pan and Baste the outside of the chicken with the juices.
  6. Let rest for 15 minutes.  Carve it up and devour!!

Paleo Pasta or OOdles of Zoodles

Paleo Pasta or Zoodles

UPDATE:  I have fixed all the links in my previous posts so you can now get to them!!

Being someone who doesn’t eat grains and wheat or wheat based products anymore, I sometimes get nostalgic for pasta type dishes.  I have found the answer,  it’s really nothing new or earthshaking, but I have been eating them a lot of late and thought I’d share them with you.

You guessed it Zoodles or noodles made from zucchini.  I purchased a vegetable spiralizer like this ONE and am very pleased with the results.  I can make a fresh healthy “pasta” dish in minutes.  These noodles don’t weigh you down like real pasta, and are fun to make and eat.  Not only can you use zucchini, you can use yellow summer squash, carrots, beets, cucumbers etc…. think of all the colorful combinations!!!

Paleo Pasta or Zoodles

2 smaller sized zucchini (or yellow squash or a combo)

1 TBL Olive Oil

Salt and Pepper to taste

  1. Heat a skillet on the stove to medium hot.
  2. Pour in Olive Oil
  3. Add the Zoodles and toss
  4. Salt and Pepper to Taste
  5. Add Marinara, Pesto, Alfredo, Fresh Olive Oil, chicken, meatballs, clams, shrimp etc. you get the idea.  Enjoy!


Parsnips And Happy 2015!!!!

Parsnips
Parsnips

Happy New Year!  So exciting and grateful to face yet another glorious year of endless possibilities.  My resolution this year is to try something new each month, big or small from food to travel to books to sports or a class perhaps.

I recently tried ice climbing and was so surprised how invigorating it was to try something new and totally out of my comfort zone.  I was also surprised at how much I liked it.

So that will be my barometer if it is out of my zone, comfort or otherwise I will try it.  I’ll let you know what it is each month.

On to parsnips they may be new to you or not, but often they get overlooked at the grocery store.  Parsnips are a wonderful taproot vegetable that are very versatile.  For the full skinny on the parsnip read HERE.

Full of vitamins minerals and fiber they are a nice alternative to potatoes.  You can fry, roast, mash, puree or eat them raw.  I have been using them mashed lately as they go well with all types of protein from salmon to roast pork.  Martha Stewart has 21 different recipes for parsnips HERE.  Shake it up a little this winter and eat some parsnips.


Mashed Parsnips

3 Parsnips (good sized) peeled and chopped into 2 inch sections

1/4 cup Butter

Splash of cream

Salt and Pepper to taste

Boil the parsnips until they are soft.  Add the Butter and cream salt and pepper and mash using a hand mixer, a fork or an immersion blender until they are smooth and creamy!  The amounts above are an estimate add more butter or cream if needed.


Plantain Pizza Crust

Plantain Pizza Crust

I can not take credit for this easy super delicious thin and crunchy crust.  I found it HERE on a website called Simple & Merry!

I love pizza and have spent the past few years trying to find a delicious gluten- free and grain-free crust.  I have tried them all from zucchini to cauliflower to almond flour and this one hits the spot!  It is quick, easy and requires 4 simple ingredients.

The runner up crust, which is a bit more involved, but includes the yeasty flavor of a real pizza crust is at the Zen Belly Blog HERE. Check it out!

I just made this plantain crust for a very skeptical non gluten-free friend and she was very pleased with the results, so I dare you to try it!

I will give you the Simple & Merry recipe with my adapted version of cooking instructions! Check out her recipe as well!


Plantain Pizza Crust

4 Cups Chopped GREEN Plantains  2-4 plantains depending on their size 

1/3 Cup Olive Oil (make sure it is real olive oil)

1/4 -1/2 Cup Water

1 tsp.  Salt


Preheat your oven to 450 degrees.  To make a real crunchy thin crust use a pizza stone set on the bottom rack of your oven.  Place the stone in the oven as it is preheating.  If you don’t have a stone still bake your crust on the bottom rack on a cookie sheet.

Place all ingredients in a food processor or a high powered blender.  Start with 1/4 cup of water and add more in small increments until the plantains blend into a smooth paste.

On a cookie sheet or pizza peel add a piece of parchment paper and oil it with some olive oil.  Spread the plantain paste thinly on the oiled parchment to your desired size.

When the oven is preheated slide the parchment off of the cookie sheet or peel onto the pizza stone and prebake the crust until the edges start to brown.

Take the prebaked crust out and add what ever toppings your little heart desires.  Now slide the pizza crust off the parchment directly onto the stone and bake just long enough for your cheese to melt and the toppings to warm up, watching so the crust does not burn.

Slide the pizza off the stone onto your cookie sheet or peel and let cool enough to devour.

This crust tastes best warm and fresh from the oven, but isn’t so bad reheated in a toaster oven the next day.

* It is important that you use green plantains because they are have more starch and less sweetness than a ripened or ripening plantain.


Happy New Year 2014! Shepherd’s or Cottage Pie

IMG_0748[1]

Happy New Year !  So exciting to start a fresh year and visualize all the possibilities for the months ahead.  January tends to be the longest month of the year for me and I like to fortify myself through this long winter month with stews and hearty meals.  Shepherd’s pie definitely fits into this category and is a staple at my house.

As promised weeks ago to my sister, here is my Shepherd’s pie recipe.  More accurately it would be called Cottage Pie as the cows (ground beef) stay close to the cottage, if you use lamb it would be a true Shepherd’s Pie.  You can use any ground meat to your liking.  Regardless this is a delicious “one pot” meal that I can easily eat for breakfast, lunch, and supper.

paleo shepard pie

IMG_0737[1]

IMG_0739[1]

IMG_0740[1]

paleo shepard's Pie

Shepherd’s Pie Recipe

1 Onion diced

1 lb. Bacon chopped (pastured clean pig is best)

2 Carrots diced

1/2 Bunch of Kale chopped

4  Stalks of Celery diced

1 1/2 lb.  Ground Meat pastured grass fed is best (beef, turkey, lamb, elk, venison)

1/2 tsp. Smoked Paprika

1 Cup of Chicken Broth

1 Head Cauliflower

2 Large Parsnips

2-3 Tbl.  Butter

Salt and Pepper to taste

Directions: Cut up the Cauliflower and steam until tender.  Peel and cut up the parsnips and boil until tender.  Drain each and combine, using an immersion blender or food processor puree the cauliflower and parsnips add the butter and salt and pepper. While the parsnips and cauliflower are cooking, cook the bacon in a sauté  pan until done, remove the bacon from the pan and sauté the onions in the bacon grease for 4-5 minutes.  Add the ground meat and cook for 5-8 minutes add the kale, carrots and celery sauté for 4-5 minutes add the bacon back in and then add the 1 cup of chicken broth and cook for 4-5 minutes more.

Put the meat and veggie mixture into a 9×13 baking dish, put the cauliflower and parsnip puree on top and drizzle with a little olive oil.  Bake in a 350 degree oven until heated through about 25- 30 minutes.  Enjoy!

Note:  You can skip the cauliflower and parsnips and just use white mashed potatoes for the top as well.

Quick Paleo Sushi

IMG_0716

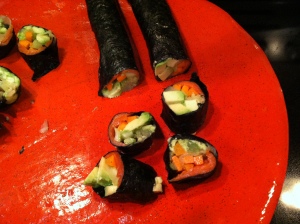
Who needs rice?  This paleo sushi is quick and easy to make and sky is the limit with what you can combine to make some tasty sushi.  I serve it with some wasabi and a little coconut aminos and it makes a nutritious light meal that you can eat with your fingers.

IMG_0712

This is what I had on hand last night to make a quick and easy paleo sushi dinner.

Paleo Sushi

1 package Nori

Smoked salmon or Lox

Carrots peeled and thinly sliced into strips

Pickled Ginger (The Ginger People brand is the best)

Avocado sliced thin

Cucmber or Jicama or Celery sliced into thin strips

(You can come up with any combination of fillers for your Rolls be creative!)

Place Nori on a rolling mat,  layer your ingredients and wet the end of the Nori.  Roll tightly and let the roll rest a few minutes before slicing with a sharp knife. Serve with coconut aminos or tamari sauce and wasabi for a kick.  (I roll the pickled ginger right inside the rolls to add to the flavor).

IMG_0713