Uncle Ted’s Soft Scrambled Eggs

Uncle Ted's Soft Scrambled Eggs
Uncle Ted’s Soft Scrambled Eggs

Happy Holidays!  I hope your holiday season is joyful and peaceful.

I grew up in upstate New York and until I was in high school, we would get real winter with lots of snow.  It seems every Christmas of my youth, we would get a new red plastic sled.  This was because either we had broken the previous year’s sled, or the kid down the street ,Ray Ray, had stolen our sleds.

You know someone is badass when they are called by their first name twice, and let me tell you Ray Ray was.  That kid was tougher than nails and crazy wild.  I once saw him fall out of a 20 foot tree fort and land like a ton of bricks onto his back.  We all thought he was dead, only to be amazed when he got up, swore a mouthful of expletives and proceed to climb back up the tree to the fort (which he lived in for a while).

Ours was a rough and tumble childhood (not as rough as Ray Ray’s), but all the same we played hard and were always outside.  The hills we sledded on typically had barbed wire fences at the bottom, so you had to bail off your sled or be sliced to smithereens.

Depending on the snow conditions, we would either use our red plastic sleds or if it was packed and icy we used the red flexible flyer runner sleds.  We’d pile 4 kids deep on top of Michael D. and fly down an old unused road, each bump and turn tossing off the top kid.  Someone usually ended up with at least a bloody nose or a head full of burdocks.  Ahh such fond memories of my wild free range childhood, no cell phones or computers or ipads or over protective parents, just simple fun and good times.

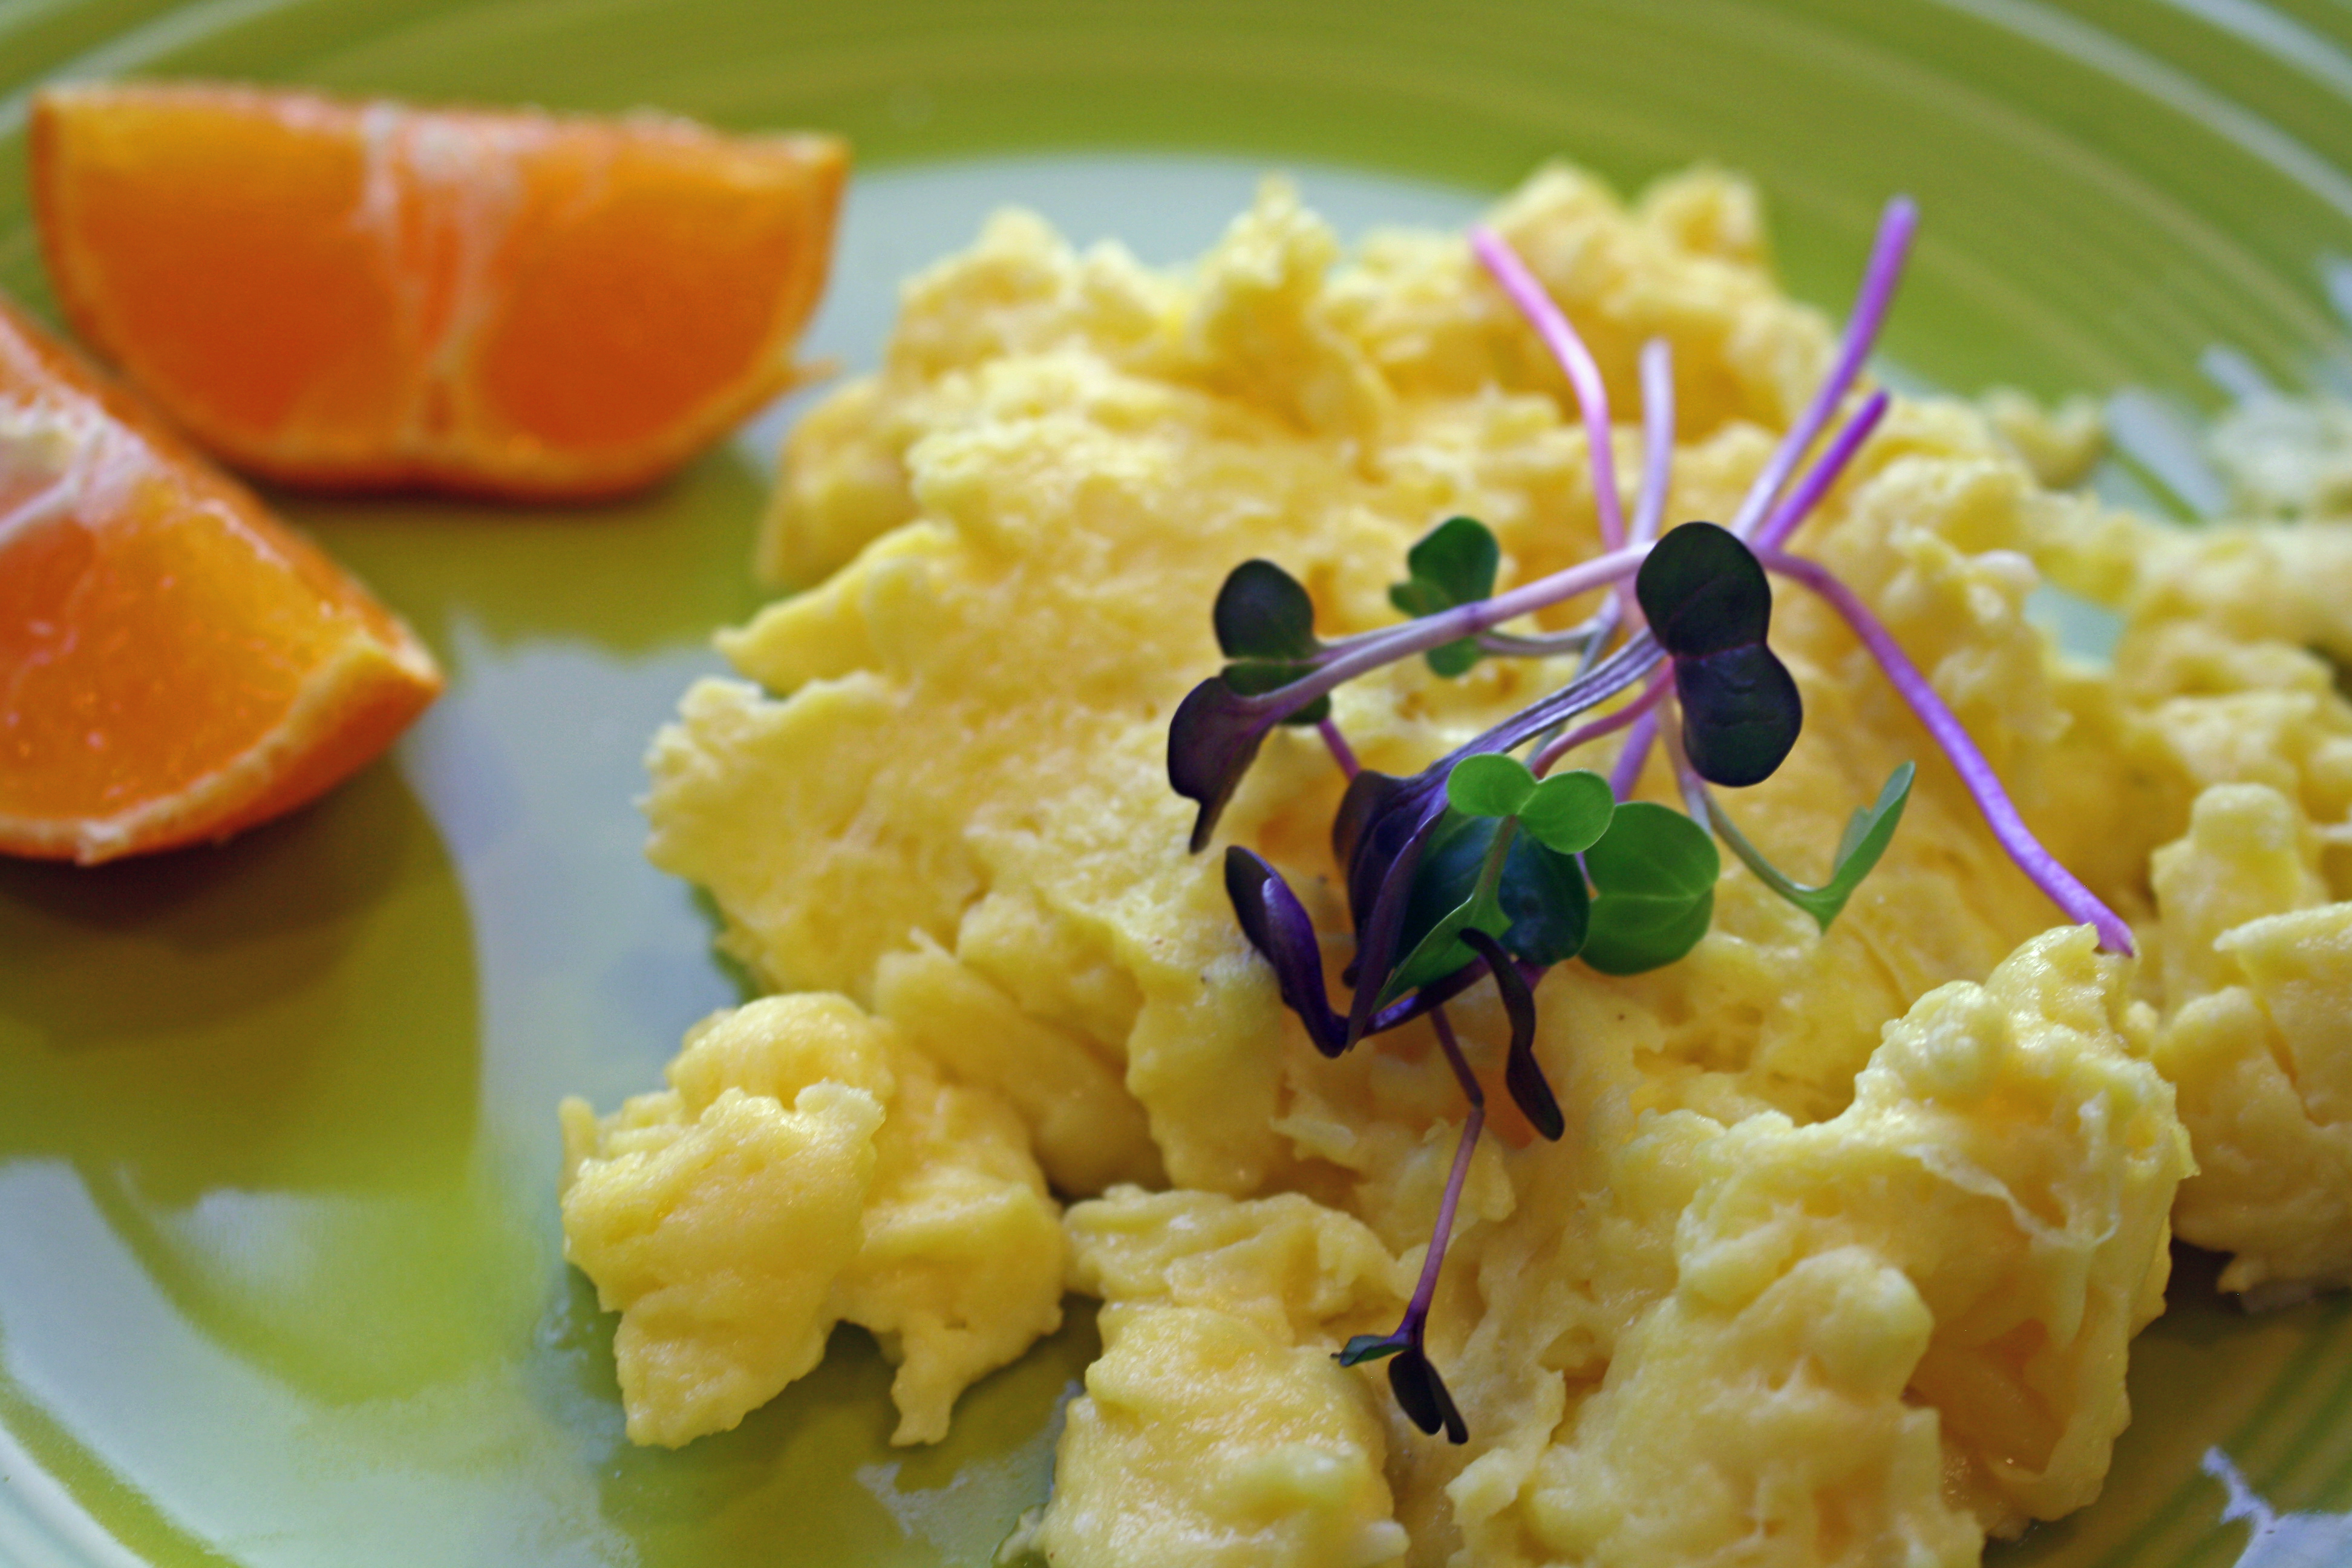
These eggs are a far cry from rough and tumble. They are velvety and creamy goodness.  You have to dedicate a little more time and focus to them, but you will be rewarded greatly in the end.  Follow Uncle Ted’s directions to the tee (he is a foodie through and through and knows his stuff), and enjoy the best scrambled eggs you have ever tasted….guaranteed!!

Uncle Ted’s Soft Scrambled Eggs

4 Large High Quality Eggs

Salt and pepper to taste

Butter for the Pan

  1. Heat a small fry pan on medium heat, use a pan that matches the amount of egg meaning not too big or not too small.
  2. Crack the eggs into a mixing bowl.  Uncle Ted recommends removing the bit of white that connects the whites to the yolk.
  3. With a whisk vigorously whisk the eggs until a foam forms on top. (approximately 80 whisks).  Salt and pepper to taste.
  4. When the eggs are foamy, add the butter to the pan and pour the eggs in.
  5. Now here is where the focus comes in…continuously stir the eggs with a spatula DO NOT lose focus.  When the eggs are still a bit wet pull them from the heat stir one more time and serve immediately.
  6. Enjoy the creamiest eggs you’ve ever had!!!     Serves 2
Advertisement

Gluten-Free Molasses Cookies

Gluten-Free Molasses Cookies

As the weather gets colder, I start craving hardier foods and molasses cookies fall into that category.  Something about the rich flavor of black strap molasses and spices, makes this cookie a perfect winter companion.

The Paleo Mom just posted about all the great benefits of unsulfured black strap molasses, which you can read HERE.  And read it you should, you will be amazed at all of the great nutrition in this sweetener.

I have made 3 half batches of these cookies and after eating 4 or more, gave them away only to make another half batch to eat and give away (Pete and repeat).  I tested these on non-gluten- free people and they had no clue they were gluten-free and low on the sweetener.  They have that crunch on the outside and are soft and chewy on the inside.

Gluten-Free Molasses Cookies

2 Cups Almond Flour

6 TBL Butter, melted

5 TBL unsulfured Black strap Molasses (like this one)

1TBL Vanilla

1 TBL Ground Ginger

1 TBL Cinnamon

1 tsp Cloves

3/4 tsp Allspice

1 tsp Baking Soda

1 tsp Baking Powder

1/2 tsp Salt

Coconut Sugar or Organic Sugar (to roll cookie dough balls in)

  1. Preheat the oven to *350 Degrees, Line a cookie sheet with parchment or lightly grease with butter.
  2. Mix all the dry ingredients in a bowl.
  3. Melt the butter and add molasses, and vanilla
  4. Add the wet to the dry ingredients, Mix until all is incorporated
  5. Scoop out cookie dough with a cookie scoop and roll into a ball
  6. Roll the ball in the sugar, coating all sides, place on cookie sheet, slightly press each ball down.
  7. Bake in the oven for 5-8 minute until the tops begin to crack and the edges darken slightly.
  8. Let cool completely and enjoy.  Makes about 20 cookies

Chia Jam

Chia Jam
Chia Jam

Since my consumption of bread products has decreased to almost nil, I haven’t had much interest in jam.  But the other day my dear friend turned me onto this delicious simple recipe she found in a cookbook she had newly acquired.

It is a vegan cookbook called ‘The Oh She Glows Cookbook’, there is also a blog by the same name.  You can check out the cookbook and blog HERE.  When my friend first told me about the cookbook, I was a bit skeptical as it was it was vegan, and as you know I am a bona fide meat grower, hoarder, and eater.  Alas another lesson learned to keep the mind open and explore territories outside of your own realm.

She gave me a jar of this jam and it was devoured in one sitting.  It is fast and easy to make, very low in sweetener and has good for your chia seeds in it to boot!!!

The rolls in the picture above are gluten-free yeast rolls made with Otto’s Cassava flour, I found the recipe on the Paleo Mom website.

Chia Jam (Adapted From The Oh She Glows Cookbook)

3 cups of Berries of your choice, Fresh or Frozen ( I used the Costco Antioxidant organic blend)

1-3 TBL Maple Syrup or Honey (I used 2 TBL of Maple Syrup and it was plenty sweet)

2 TBL Chia Seeds

1 tsp. Vanilla

  1. Place Berries and sweetener in a saucepan on stove and bring to a simmer on med to medium high heat.
  2. Simmer and stir until berries begin to soften and mash with a fork.
  3. Add the chia seeds and continue to simmer until the jam gets to your desired thickness.
  4. Remove from the heat and stir in the vanilla.
  5. Ladle into a glass jelly jar and store in the fridge.
  6. Enjoy on pancakes or ice cream or gluten-free bread products or straight out of the jar!

Chocolate Mint Bat Cookies Gluten-free

Mint Chocolate Bat Cookies

Happy almost Halloween!  Fall is flying by here and we have been busy trying to soak up the last nice autumn days.  We did a family horse-pack trip in Yellowstone park last weekend, unplugged and outside for 4 glorious days, such a treat to reset and reconnect with the family unit.

Once we came home we jumped right back into the busy life, planning my daughter’s 8th birthday bat bash.  My kids get two birthday celebrations, a “family one” and a “kid one”, every year I kick myself for starting that tradition.  I go a little overboard on celebrating birthdays, and I was pondering why the other day.  Then it hit me, I learned it from my mom, even though I was ten out of eleven kids she always went big for my birthday celebrations and made me feel super special on my birthday.  It’s ingrained in me to carry on the tradition I guess.  Plus birthdays are cause for big celebration in my book, every year we get on this glorious planet should be honored and marked by some joy making!  Anyway, we had a great bat bash.

I made these cookies to share with the parents that might happen to linger at the party.  Alas not a parent stayed so,  me being the only parent in attendance got to eat a couple of these babies, the rest are in the freezer waiting to be consumed by some Halloweenies.

I used Elana’s pantry recipe for “Girl Scout PaleoThin Mint Cookies” that you can find HERE and a bat cookie cutter. The only change I made was to cut the sweetener in half.  By the time they got a thick coating of dark chocolate, my bats were far from thin, but oh so delicious.  I used Trader Joe’s Pounder bar of 70% Chocolate to dip them in.   Check out her recipe if you want to relive the Girl Scout thin mint cookies in a little bit healthier fashion.


Mint Chocolate Bat Cookies (Adapted from Elana’s Pantry)

  • 1 cup Almond Flour
  • 1 teaspoon Coconut Flour
  • 2 tablespoons Cocoa Powder
  • 1/4 teaspoon  Sea Salt
  • ¼ teaspoon Baking Soda
  • 2 tablespoons Palm Shortening
  • 2 TBL Honey
  • 1 teaspoon Peppermint oil or Extract
  • 6 ounces or more Bittersweet Chocolate Chopped
  • ½ teaspoon Peppermint oil or Extract
  1. In a food processor, combine almond flour, coconut flour, cacao, baking soda, and salt
  2. Pulse in shortening, honey, and peppermint extract until dough forms
  3. Roll out dough between 2 pieces of parchment paper to ⅛ inch thick
  4. Freeze dough for 15 minutes
  5. Using a cookie cutter of your choice , cut out dough
  6. Transfer  to a parchment lined baking sheet
  7. Bake at 350° for 4 minutes
  8. Cool completely on the baking sheets, then freeze
  9. Melt chocolate and peppermint extract in a small saucepan over very low heat
  10. Dip each cookie in chocolate
  11. Place in freezer until set and serve
  12. Store Cookies in the Freezer

Deep Fried Brussel Sprouts

The Fryer
The Fryer
Deep Fried Brussel Sprouts

Even if you don’t like Brussel sprouts, I bet you will like them prepared this way.  I had my first taste of these babies last year when my husband and I went out to dinner.  They were delicious, however I felt bad when I found out they were fried in, of all things, soybean oil !!!   Seed oils are not good for you, period, so I decided I would make these at home and avoid any more restaurant surprises.

My first attempts didn’t work out to well, as I was trying to fry them in a pot on an electric stove.  For those of you that cook on electric, you know it is next to impossible to maintain a stable heat.  They turned out soggy or burnt.

I finally decided to buy myself a little deep fat fryer, thank goodness for Amazon Prime and the ability to impulse shop your heart out.  I am very pleased with the little fryer (pictured above) that I ended up with.  I wanted something that didn’t require too much oil, as I planned on using coconut oil and as you may or may not know it is a tad pricier than your run of the mill “bad for you” seed oils.  Coconut oil is a good choice as it has a high smoke point and has some very healthful qualities.   Also I don’t fry things that often, so I have no need of maintaining a huge vat of oil for extended periods.  This inexpensive fryer works great!

If you have a gas stove and decide to try making these  in a pot on it,  let me know how they turn out otherwise, I recommend a little deep fryer the one above you can get here.  Then make these tasty little treats….. even the kids will like them!!


Fried Brussel Sprouts

1 Pound Brussel Sprouts trimmed and washed cut in half and towel dried

Coconut oil

Salt to taste

  1. Fill your deep fryer according to manufacturer directions with coconut oil or use a small sauce pan and 1-2 cups of coconut oil.
  2. Heat the oil to *375 degrees
  3. Fry the Brussel Sprouts in little batches until the start turning brown around the edges and outside
  4. Lift the Brussel sprouts out of the oil and place in a paper towel lined bowl and sprinkle with salt.
  5. Let cool a moment and devour.  Repeat until they are all cooked.    Serves 1-4 People

Camping Breakfast Burritos

camping breakfast_edited-1

This is a photo from my Iphone (excuse the bad quality) from our last family excursion.  We did a horsepack trip into the mountains a couple of weekends ago to listen to the elk bugle and to hike a ridge.

After so many of these trips, I have streamlined my food prep to be mostly at home with easy cooking out in the field.  This is a picture of our breakfast burrito I thought I would share with you, so you have a hearty breakfast idea for your next camping trip.

Notice the horse in the background eating calmly?  Little did we know they would take off in the night and run all the way back to the truck, leaving us to abandon the tack and gear and hike the 6 miles out.   Yes we did catch up with the wild horses and retrieve our gear a day later and came home with a good tale to tell.  A great family adventure!!!

Camping Breakfast Burrito

1 Yellow Onion diced

1-2 Cloves of Garlic minced

2-3 Medium sized Potatoes diced

1 Pound Breakfast Sausage (I have used pork or chicken links, whatever you fancy)

  1. Heat a skillet up to medium on the stove top sauté the garlic and onions 2-3 minutes.
  2. Add in the potatoes and sauté until they are just starting to soften.
  3. Add in the sausage and cook until done.
  4. Let this all cool and package for the trip.

Out in the great wild all you have to do is dump some burrito mix into the pan and heat it up adding your desired amount of eggs.  Serve on a tortilla (or not) with some salsa.  Add some cheese if you tolerate it and Enjoy!

This makes about 8 servings.

Lime Butter Sauce

Lime ButterSauce
Lime Butter Sauce

I’m baaaaack!  Once again sorry for such a long pause in my posting.  I had a goal to post once a week and I seem to be falling a wee bit short of that goal of late.

Alas the kids are back in school, and this past weekend, I spent the whole weekend cleaning and getting caught up from a summer of guests and fun.  The cleanliness of my house did suffer a bit from the summer mayhem, but time spent with family and friends far outweighs a clean house in my book.

We are now hitting my favorite time of year here in Montana, Indian summer, things slow down a bit, my hoarding instincts kick into full power, and the nights are cooler and longer.

I have been eating lots of salmon and fish lately, and wanted to share with you this little gem I found to slather just about any type of fish or vegetable in to make it taste even more divine than it is.  This recipe is from over at Epicurious HERE.  I have only slightly tweaked the amount of salt in this Lime Butter recipe.  If you know me you know, I love Kerrygold butter, so if you can get your paws on the stuff I recommend it for this sauce.

Oh, it is so quick and easy to make too….BONUS!  Enjoy it on fish or vegetables and let me know what you think!


Lime Butter Sauce (adapted from Epicurious)

1/4 Cup Fresh Squeezed Lime Juice

1/2 Cup (1 Stick) Butter Melted (I use Kerrygold)

1 Clove Garlic

1/2 tsp. Salt

Pepper to taste

  1. Place all but the butter into a blender and blend for about a minute.
  2. Slowly drizzle the melted butter into the blender while on low to incorporate blend on medium speed for about 30 seconds.
  3. Drizzle on Salmon, Mahi Mahi, or Vegetables!
  4. Makes about 3/4 of a cup!  Store the extra in the fridge it will last for weeks.

Paleo Gluten-Free Chocolate Date Balls

Paleo Gluten-Free Date Chocolate Balls

A dear friend of mine stopped by to visit us this summer, and brought with her these addicting tasty treats.  I have made and eaten multiple batches since she has departed so, I felt it was my duty to share these with the rest of you.

I have found them to be the best hiking treats to throw in my pack or an after cross fit pick me up.  They are super easy and fast to make and they blow Lara bars out of the water.

Yet again I can not take credit for the invention of these and I found a recipe HERE at Chocolate-Covered Katie.  Check her out she has loads of scrumptious looking treats on her site.   The recipe my friend gave me was titled German Chocolate Fudge Balls, so I do believe there are many renditions of these online.

Of course I have altered the recipe to my own liking and you will too once you find what nuts you prefer and how much chocolate you want to add.  I like to keep them in the refrigerator as they get just the right firmness and the cool treat is preferred in the summer time heat.


Paleo Gluten-Free Chocolate Date Balls

8-9  Pitted Soft Medjool Dates

1 1/2 tsp Vanilla

2 Heaping TBL Shredded Unsweetened Coconut

2-3 TBL Pecans or Walnuts

1/2 tsp Sea Salt

1/2 Cup Bittersweet Chips or Dark chocolate Chunks

  1. Throw everything into a food processor and process until a big ball forms or it is all well incorporated.
  2. Roll into bite size balls then roll in some shredded coconut or cocoa powder.
  3. Store in a glass container in the fridge (the fridge is not mandatory).
  4. Makes about 12 Balls

Paleo Gluten-Free Waffles

Paleo Gluten-Free Plantain Waffles

Well it has been quite a while since I have posted, and I apologize for that my faithful readers (all 2 of you)!!

A crazy busy fun summer it has been so far at Hillbilly Haven and beyond.  Lots of company has come and gone, and we did a little family trip to the east to visit and swim, swim,  swim.   We butchered the meat birds and the freezer is full of poultry.   I have put up some dill pickles and pickled beets,  my food hoard is coming along nicely for the winter.  The pigs are growing daily enjoying their summer, I’m still coming to terms that they will be part of my food hoard come the winter.

Our one staple through it all has been these Paleo plantain waffles.  I so wish I could take credit for these babies, but alas I cannot.  The only thing I did was make them into waffles instead of pancakes and that idea came from Chris Kresser.  I found the plantain pancake recipe HERE at The Paleo mom website.  She has some awesome recipes with plantains and other foodstuffs, check her out.

They are fast to make and taste great and ALL of my family members like them which is quite a feat!!

Paleo Gluten-Free Waffles (recipe slightly adapted from The Paleo Mom)

Ingredients:

  • 2 large Green Plantains (about 2 cups pureed)
  • 4 Eggs
  • 1 TBL Vanilla
  • 3 Tbsp Coconut Oil or Avocado Oil
  • 1/4 tsp Salt
  • ½ tsp Baking Soda
  1. Peel plantains (I find it easier to quarter them before I peel them) and place pieces in your blender (preferred) or food processor (okay) with the eggs.  Blend to form a smooth batter (if your blender has a smoothie function, that works well here).
  2. Add the rest of the ingredients to the blender or food processor and process on high for an additional minute (or 2-3 with a food processor to get a really good smooth batter).
  3. Heat your waffle iron and pour the batter in, cook according to your iron’s directions.
  4. Repeat until all batter is used.  Keep warm in the oven or eat as soon as they come out!  Enjoy!  Makes about 5 Belgian Waffles

Paleo Confetti Coleslaw

Confetti Coleslaw
Confetti Coleslaw

Coleslaw is one of the main staples here at Hillbilly Haven.  It’s a nice change from regular green salads, and personally I just love all the gorgeous colors mixed together.  I love eating color and wearing color and painting color and seeing color.  Bright, juicy, rich, happy, nutritious color!!!

That makes me think of how many creative people there are in the world. A couple of years ago,  I went from runner to podcast walker (one who listens to podcasts whilst walking).  The line up of my podcasts include; Radio Lab, This American Life and The Ted Hour.  Each time I walk and listen, I learn of yet another group of creative people in all realms of society, doing amazing stuff.  It really makes me feel so reassured and awed to know that these people exist and are adding so much to the world!

One of our go to meals is Fish sticks (mahi mahi or a similar white fish coated in egg and almond flour baked in the oven ) served with a side of coleslaw.  I also include my “special sauce”,  homemade mayo mixed with a bit of organic ketchup.  It’s a simple nutrient dense meal that is quick to prepare.

My recipe is just a guideline for building your coleslaw, feel free to add anything you think would taste good!!  Remember to eat from the rainbow!!

Confetti Coleslaw

1/4 Head of Red Cabbage, Cut thinly

1/3 Head of Green Cabbage, Cut thinly

3 Medium Carrots, Grated

1/2 Bunch of Parsley, Chopped

1-2 Organic Apples, Chopped

Salt and Pepper to taste

Optional Additions include: Grated Jicama, Pumpkin seeds, Sunflower Seeds, Currants, Shredded Beets, Grated Brussel Sprouts etc……

  • Place all the prepared Veggies into a large bowl.

Dressing

1/2 Cup Olive Oil (good real olive oil)

1/4 Cup Organic Apple Cider Vinegar (use a brand like Braggs with the “mother” in it)

1 Heaping tsp. Stone ground or Dijon Mustard

1 tsp. Maple Syrup or Honey (use more if you like it a bit sweeter)

Salt and Pepper to taste

  • Mix all the dressing ingredients together and adjust for taste.  I like to use an immersion hand blender to get a creamy dressing,
  • Add the dressing to the coleslaw and mix well.  This coleslaw tastes better with time as the dressing marries with the veggies, so feel free to make it ahead of time. You may want to double the dressing if you add more veggies.